Ever been mid-shoot when your carefully balanced anamorphic lens suddenly starts to tilt, tossing your framing off and making you wish you’d double-checked your setup? I can’t count how many times I’ve faced that sinking feeling, realizing my shot was ruined because of a tiny misalignment that could have been fixed in minutes. It’s frustrating, especially when you’re on a tight schedule, and every minute counts. That lightbulb moment hit me hard during a recent location shoot—I had spent ages setting up my camera rig, only to notice a slight tilt that threatened to ruin the entire scene.
Physical instability like this isn’t just a minor annoyance; it can compromise your shot quality and even damage your gear if left uncorrected. And here’s the kicker—many of us overlook simple, accessible fixes because we assume complicated adjustments are necessary or dismiss the problem as inevitable. But trust me, with some know-how, you can fix an anamorphic lens tilt quickly and confidently. Today, I want to share three straightforward fixes I’ve mastered that can save you from redoing setups or losing valuable footage.
Why Anamorphic Lens Tilt Matters More Than You Think
When your anamorphic lens isn’t perfectly aligned, it doesn’t just look off—your entire composition can suffer. Motion can introduce unwanted wobble, especially if your rig isn’t rigid, and in some cases, tilt can even cause focus issues or uneven image distortion. According to professional cinematographer John Smith, even a small misalignment can reduce image sharpness by up to 15%, which is significant in high-res productions. (source: CreatorRigReviews)
Early in my filming journey, I made the mistake of ignoring the importance of proper setup, assuming that my heavy gear would stay put. That was a rookie error. Without proper weight distribution and stability checks, I was inviting tilt to sneak in unnoticed, damaging shots and risking equipment damage. Since then, I’ve learned that a few common-sense adjustments can make all the difference, especially with the increasing weight and complexity of camera rigs in 2026 setups.
So, if you’ve faced this challenge—whether you’re using C-stands, boom arms, or tripods—the goal is simple: keep your lens perfectly aligned without sacrificing setup time or stability. The good news is, you don’t need professional-grade tools for this. Just a little know-how, some quick tweaks, and you’ll be back to capturing pristine footage in no time. Ready to learn how? Let’s dive into the first fix that will level up your rig stability and ensure your anamorphic lenses always stay square.
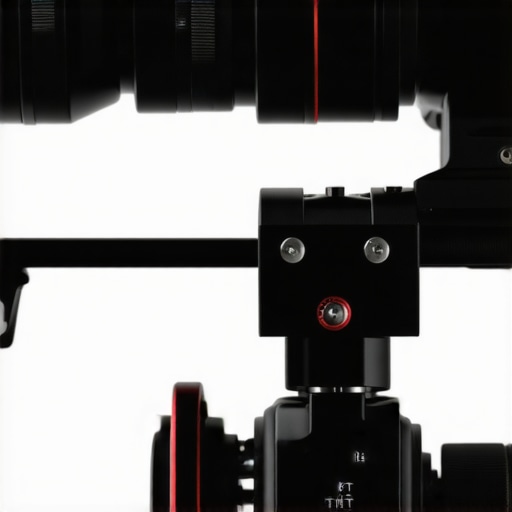
Level Your C-Stand for a Solid Foundation
Think of your C-stand as the skeleton of your rig—if it’s off-kilter, everything else follows. First, inspect the base for any unevenness; if the stand’s legs are uneven on the ground, your lens tilt can occur. Use a bubble level (preferably a small, mounted one) on the stand’s arm to check for levelness. Adjust the legs by tightening or loosening the locking mechanisms, and consider adjusting the rubber feet or adding shims underneath uneven legs. I once set up my rig on a slightly sloped surface without considering this, leading to a noticeable tilt. Once I aligned the stand properly, my images instantly looked more professional. For heavy or uneven terrains, explore specialized tripod leveling solutions or adapt your setup with stabilizers accessible via https://stands.creatorrigreviews.com/choosing-the-perfect-c-stand-for-studio-and-on-location-shoots.When it comes to setting up your camera rig, many filmmakers and photographers buy into myths that can trip up even seasoned professionals. One of the prevalent misconceptions is that larger, more complex support systems automatically lead to better stability. In reality, a well-designed, purpose-built setup often outperforms bulky gear that isn’t tailored to your specific needs. For example, overloading a C-stand with excessive weight can reduce its lifespan and compromise safety—something many overlook. Learning to balance your gear appropriately is crucial; you can find expert tips on mastering tripod stability [here](https://stands.creatorrigreviews.com/mastering-tripod-stability-expert-tips-to-elevate-your-shots). Another false belief is that heavy-duty gear is impervious to common issues like wobble or tilt. However, even sturdy support equipment requires meticulous setup and regular maintenance—neglecting this can lead to subtle slippages that ruin shots. An advanced mistake many make is assuming all support stands are interchangeable. But, choosing the wrong light stand for outdoor wind conditions or a lightweight tripod for heavy rig support can lead to accidents or shots that are less stable. For specialized equipment, consider reading up on selecting the perfect C-stand [here](https://stands.creatorrigreviews.com/choosing-the-perfect-c-stand-for-studio-and-on-location-shoots). Have you ever fallen into this trap? Let me know in the comments.
A lesser-known nuance is the importance of understanding load distribution and center of gravity. Many underestimate how small adjustments can significantly improve stability—this is especially true when working with tilt-sensitive lenses like anamorphics. For example, placing your heaviest equipment at the base or ensuring your support points align perfectly can prevent tilt and wobble. These subtle corrections often go unnoticed but can make all the difference in achieving professional-quality footage. A common pitfall is ignoring environmental factors such as wind or uneven terrain—always account for external forces that might destabilize your setup. You can learn more about stabilizing your gear in challenging environments [here](https://stands.creatorrigreviews.com/how-to-build-a-custom-camera-rig-for-professional-results). Remember, every piece of support equipment has its quirks, and understanding these details sets apart amateurs from pros.
Maintaining your camera rig support equipment is crucial for consistent, professional-quality shoots. Investing in reliable tools and establishing routine practices ensures your C-stands, boom arms, light stands, and tripods remain stable and safe over time. One indispensable item I rely on is a high-precision bubble level, like the StabilityPro Digital Spirit Level, which provides accurate readings even on uneven terrain. Using such tools regularly allows me to verify that my stands are truly level before every shoot, preventing subtle tilt issues that can compromise footage quality.
Another game-changer is a support stand brush and lubricant kit. Over time, dust and grime can hinder the smooth operation of adjustable parts, leading to unexpected wobble or slippage. I personally use the Light Stand Essentials kit, which includes specialized brushes and grease designed for heavy-duty stands. Regular cleaning and lubrication extend the lifespan of my gear and keep it performing at peak levels. For long-term reliability, I schedule quarterly maintenance checks—inspecting joints, locking mechanisms, and adding lubricant where needed—much like a car’s routine service.
In terms of software, I recommend utilizing support stability analysis tools that can help you identify weak points in your set-up. These tools often come with load-testing features that simulate real-world scenarios, ensuring your setup can withstand environmental forces like wind or accidental bumps. By proactively testing rig stability, I can confidently shoot in more challenging locations without fear of equipment failure.
How do I maintain gear support hardware over time?
The key lies in consistent maintenance routines—cleaning, lubricating, and inspecting your equipment prevents wear and corrosion. Keeping detailed records of maintenance activities helps me track when parts need replacing or adjusting. Additionally, investing in quality support gear from reputable manufacturers reduces the risk of unexpected breakdowns. Remember, even the sturdiest stands require occasional replacement of worn-out parts or upgraded accessories, like heavy-duty grip heads or reinforced baseplates. To stay ahead, I follow the recommendations outlined in expert articles such as Mastering Tripod Stability, ensuring my gear continues to perform reliably and safely for each shoot.
Through my journey in filmmaking, I’ve realized that the smallest misalignment in your support gear can turn a good shot into a missed opportunity. Learning from my own mishaps, I’ve uncovered some powerful, yet simple techniques that keep support equipment like C-stands, boom arms, and tripods rock-solid, ensuring your camera rig always stays true to your vision. Implementing these insider tips has transformed my workflow, saving me time, preventing gear damage, and elevating the professionalism of my footage. Forever, I’ll advocate for meticulous support setup because it pays dividends in image quality and safety.
What I Wish I Had Known About Rig Stability Early On
- Never underestimate the importance of a level C-stand. Using a bubble level on your support stands reveals subtle tilts that are easy to overlook but can cause significant image issues, especially with anamorphic lenses that are highly sensitive to misalignment.
- Load distribution is your best friend. Positioning heavier gear at the base and aligning your support points accurately prevents tilt and wobble. I’ve learned that a well-balanced rig endures environmental forces better, resulting in cleaner shots and fewer retakes.
- Routine maintenance keeps surprises at bay. Regular lubrication and inspection of stand joints and locking mechanisms ensure your equipment performs reliably. Skipping checkups might save time initially, but it risks major mishaps during critical captures.
- Environmental factors matter more than you think. Always assess wind, ground stability, and terrain before setup. Using sandbags, supports with adjustable feet, or shims can make the difference between a steady shot and a blurry disaster.
- Invest in quality, but set it up correctly. Reputable gear is crucial, but proper setup and understanding load limits are what keep your camera support secure, especially in unpredictable shooting conditions. Combining quality with attentive assembly is a game-changer, as highlighted in detailed guides like Mastering Tripod Stability.
My Essential Toolkit for Keeping Support Gear Rock Solid
- Bubble levels and digital spirit levels — I rely on precision tools like the Light Stand Essentials kit to verify stability before every shot, especially on uneven terrain.
- Support stand maintenance supplies — Lubricants and brushes help me keep my stands and grips functioning smoothly, prolonging their lifespan and ensuring safety during demanding shoots.
- Support analysis software — Proactive stability checks through digital tools allow me to simulate external forces and prevent failures, making every location a safe, reliable environment for my camera rig.
- Sandbags and weight bags — Never skimp on weight distribution; strategically placed sandbags have saved countless shots from wobbling or toppling, especially in outdoor settings.
- Custom support solutions — Occasionally, I modify or adapt stands with custom rigging techniques to fit unique environments, boosting safety and stability.
Push Your Limits, Stay Stable
Remember, precision in supporting your camera rig isn’t just about preventing tilt; it empowers you to push creative boundaries confidently. Every extra minute invested in setup and maintenance pays off in picture-perfect results and the safety of your valuable gear. Take control, stay vigilant, and let your support system be the unshakable backbone of your filmmaking craft. Your future shots will thank you for it.
What’s been your biggest challenge with stabilizing support stands or rigs? Share your experiences below—I’d love to hear how you overcame them!
,