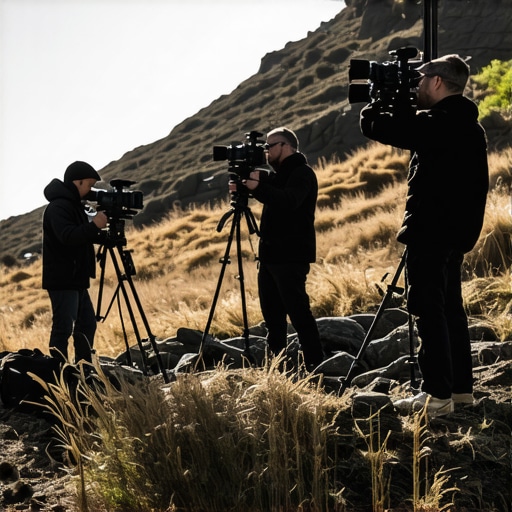
One chilly morning, I set up my cine rig atop a steep hillside, heart pounding. As I pressed record, I watched in horror as my tripod nearest the edge began to wobble uncontrollably—scared it might topple and smash my expensive gear. That sudden jolt was a lightbulb moment. I realized that despite having high-end equipment, my setup’s stability on uneven terrain was a gamble every time. Have you ever faced that uneasy sensation of your camera rig teetering on a ledge, praying it stays put? If so, you’re not alone. Managing perfect balance on hilly terrain with 2026 gear can feel like walking a tightrope.
Why Stability Matters More Than Ever with New Cine Rigs in 2026
Is Tripod Balance Still Relevant in 2026’s Shooting Environments?
When I first started out, I made a common mistake—ignoring the importance of proper tripod setup on slopes. I thought a sturdy tripod was enough, but the reality is, uneven ground demands more than just good materials. According to a recent industry report, unstable camera mounts can cause footage distortions and even equipment damage, costing time and money. Your shots deserve the best foundation—especially when working on challenging hilltops or uneven sets. That’s precisely where mastering a few balance tricks changes the game. Ready to dive into techniques that guarantee your rigs stay rock-solid, no matter the terrain?
Secure Your Tripod Firmly on Uneven Ground
Start by extending all tripod legs fully, then place weight on the shorter, sloped side to lower the center of gravity, mimicking a tripod with uneven legs leaning into the slope. Use tripod leg slip prevention techniques to ensure each leg has a secure grip. In a recent shoot atop a hillside, I used sandbags on the shorter legs, which instantly stabilized the rig, preventing slips despite the loose gravel beneath. Don’t underestimate the power of weight distribution to keep your camera steady.
Build Better Balances with Counterweights
Equivalent to a seesaw, your camera rig needs balance. Attach counterweights directly opposite the heaviest side, using your C-stand or light stand as a sturdy base. For heavy zoom lenses or matte boxes, supplement with sandbags hung on the stand arms or added to the base. During a shoot on a windy ridge, I secured an extra sandbag on my C-stand’s short arm, which eliminated sway and kept my shot lock-tight. Proper counterbalancing is a game-changer for dynamic terrains.
Adjust Tension for Tipping Points
Fine-tune tension screws on your boom arms and C-stand grip heads to combat subtle shifts. Think of this as tightening a bicycle chain; too loose, and everything wobbles; too tight, and it’s stiff. I faced repeated sagging in my boom arm during a mountain shoot but solved it by gradually increasing tension screws, tested with gentle shakes. This simple step prevents creep and maintains composition integrity.
Level Your Equipment on Sloped Sets
Use a bubble level or digital inclinometer to check your setup. Lay a small level on the rig, then make minor adjustments using the stand’s adjustable legs or pivot points. In one instance, leveling my camera on a 30-degree slope kept the horizon straight in the footage. For quick checks, consider a leveling hack that saves precious time and ensures shot consistency.
Implement Dynamic Stability Measures
Use stability accessories like weighted sandbags, grip pads, and anti-slip mats on the stand base. For external shoots, secure stands with additional weights or spikes in loose soil. In a recent outdoor session, I secured sandbags around my light stand’s base, dramatically reducing wobble from gusts of wind, resulting in sharper footage. Combining these tactics creates a resilient setup for unpredictable terrains.
 Many filmmakers and photographers believe that choosing the right gear is mostly about quality and weight capacity. However, there’s a less obvious truth: understanding the nuances of how these tools behave in different environments can make or break your shot. A frequent misconception is that heavier gear always equals better stability. In reality, overly heavy equipment can become unwieldy, especially when working on uneven terrain or tight sets. Instead, focus on proper setup techniques, like balancing your C-stand or tightening tension screws on your boom arm, which are often overlooked but crucial for preventing unwanted movement.
One advanced mistake I see many make is assuming that all tripods or light stands are created equal. Not true. Many models with similar specs can behave vastly differently based on the design of their joints and base stability. For example, some tripods with plastic locks may look sturdy but can creep or slip under heavy loads or in high winds. It’s essential to test your gear in conditions similar to your shoot—not just rely on manufacturer ratings. For that, mastering the art of [rigging C-stands on uneven ground](https://stands.creatorrigreviews.com/rigging-c-stands-on-uneven-ground-4-pro-grip-hacks-for-2026) can save you from costly mishaps.
A critical hidden nuance involves the tension settings on your boom arms. It’s tempting to set and forget, but the correct tension can dramatically improve stability, especially when supporting heavy modifiers or microphones. Tightening tension screws incrementally while testing balance prevents creep and drift during shoots. This fine-tuning skill, often deemed trivial, is actually an advanced technique that separates average setups from professional-grade stability. For expert tips, check out [the ultimate guide on boom arm setup](https://stands.creatorrigreviews.com/the-ultimate-boom-arm-setup-guide-for-seamless-filmmaking).
Another underappreciated aspect is the impact of environmental factors like wind or ground vibration. External conditions can influence your gear’s stability more than you think. Using sandbags strategically not only prevents tipping but also dampens ground vibrations that cause camera shake. Avoid the trap of skimping on weights; instead, apply [specialized weighting techniques](https://stands.creatorrigreviews.com/stop-light-stand-wobble-4-fixes-for-heavy-softboxes-in-2026) to reinforce your setup.
Finally, advancing beyond the basics involves questioning your assumptions about gear sizing. For example, deploying a lightweight but well-braced C-stand can outperform a bulky model if correctly anchored. Always consider the ratio of equipment weight versus ground support when planning a shoot. Remember, stability isn’t just about gear specs; it’s about smart application.
Do you ever find yourself relying solely on manufacturer ratings without testing real-world stability? It’s a common trap that can lead to unpredictable results. By mastering these nuanced details—like tension adjustment, correct weighting, and environment-specific rigging—you elevate your production quality to professional standards. For more expert insights, visit our [mastering tripod stability](https://stands.creatorrigreviews.com/mastering-tripod-stability-expert-tips-to-elevate-your-shots) guide. What’s the most advanced mistake you’ve made with your gear? Share your story in the comments, and let’s learn together!
Maintaining your camera rig’s stability over time requires more than just selecting high-quality equipment; it involves understanding the tools and methods that ensure lasting performance. One essential aspect is regular inspection and proper upkeep of your light stand, boom arm, and tripod to prevent wear and sudden failures. For instance, periodically checking tension screws on your boom arm can prevent unexpected droop during critical shoots, as detailed in this comprehensive guide. Additionally, applying a silicone lubricant to moving joints can reduce friction and prevent rust, especially if you’re shooting in humid environments. Using quality tools like digital torque wrenches allows for precise adjustments, ensuring each component remains within optimal tension ranges over years of use. Moreover, investing in specialized cleaning kits helps keep your stands free of dust and debris that can compromise their grip and stability. Regularly replacing worn-out parts, such as C-stand grip heads or leg locks, is vital to maintain safety and performance. As technology evolves, integrating smart monitoring tools—like load sensors or tension indicators—can provide real-time feedback on your gear’s condition, helping you catch issues early before they become costly failures. Looking ahead, the future of maintenance might include self-diagnostic systems embedded within stands and arms, offering predictive alerts and automated adjustments to prolong equipment lifespan. To implement these practices effectively, start by establishing a routine inspection schedule, perhaps weekly if you’re on the move constantly. For example, use a multi-tool kit designed for grip equipment to perform comprehensive checks. Remember, consistent maintenance not only ensures safety but also preserves the investment you’ve made in professional gear. Curious about how to optimize your setup further? Try adjusting tension screws on your boom arm following the techniques outlined in our detailed boom arm setup guide and experience the difference in stability firsthand. Keep your gear performing at its best, and your shots will benefit from long-term reliability and flawless execution.
The Hardest Lesson I Learned About Light Stands and Camera Rigs
One of the most humbling experiences in my filmmaking career was witnessing my camera rig topple on uneven terrain—an event that taught me the vital importance of understanding my gear beyond specs. I realized that no matter how advanced my equipment was, improper setup on challenging terrain could sabotage my shots. That moment pushed me to master the nuanced art of stabilizing setups, a skill that continues to save me time and frustration today.
Common Myths That I Had to Break to Stabilize My Gear Effectively
I used to think heavier gear automatically meant better stability. Turns out, this is a misconception. Overly heavy lights or stands can become unwieldy, especially on slopes. I also believed that manufacturer ratings on weight capacity sufficed. Through trial and error, I discovered that in real-world scenarios, the way you set up and balance your gear matters far more than just its weight specs. Trusting proven techniques like proper weight distribution and tension adjustments proved game-changing for my shoots.
What Experts Keep Quiet About Stabilizing Heavy Gear in Tough Settings
One secret I’ve uncovered is the importance of incremental tensioning. For example, fine-tuning tension screws on boom arms can dramatically enhance stability—details most overlook. Also, smarter weighting—like strategically placing sandbags or adjusting counterweights—can prevent subtle shifts that ruin footage. These small, often unnoticed adjustments made a big difference during my high-stakes outdoor shoots. It’s one thing to set up a stand; it’s another to make it endure the unpredictable forces of nature and terrain.
Curated Tools That Elevate My Setup Game
My go-to resource for perfecting stand stability is the comprehensive Mastering Tripod Stability guide. It’s packed with actionable advice distilled from real-world experience. I also rely on high-quality tension tools for precise adjustments, and a variety of weighted accessories, from sandbags to grip pads, that can be quickly deployed on location. For in-depth insights, the guide on building customized rigs has been invaluable in tailoring my setup for different shooting environments.
Your Next Step in Achieving Rock-Solid Shots
Don’t let terrain or external factors compromise your shot’s stability. Incorporate these nuanced techniques into your routine and see how your confidence and results improve. Every experienced filmmaker has faced moments of instability—what sets professionals apart is their attention to detail and willingness to refine their setup practices. Ready to elevate your stability game? Explore more expert tips and gear solutions at this resource page. Now, I want to hear from you: Have you ever struggled with stabilizing a heavy camera setup on uneven terrain? Share your story below and let’s grow together in mastering the art of stability.