Have you ever had that sinking feeling when your boom arm inched slowly off your sleek glass desk during a shoot? I sure have. A few months ago, I was mid-shoot, and suddenly my expensive microphone and light rig started wobbling dangerously. My heart raced—acknowledging I’d overlooked a key setup detail—making me realize just how critical proper mounting solutions are, especially on fragile surfaces like glass. That frustrating moment was a lightbulb for me: mounting boom arms securely on glass desks isn’t as simple as it seems, and the risks of accidents or damage are real.
Why Securing Boom Arms on Glass Desks Demands Special Care
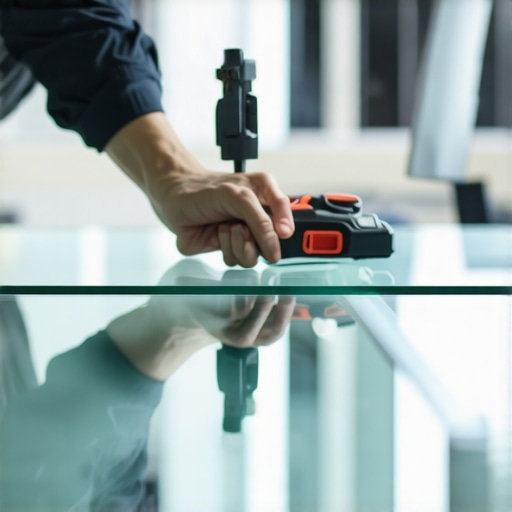
Glass desks are modern, stylish, and perfect for a minimalist aesthetic. But their sleek surfaces come with pitfalls—lack of grip for traditional clamps and instability, especially under heavy lights or microphones. If you’ve tried to clamp a standard boom arm on glass, chances are you faced slipping, wobbling, or even slightly cracking the surface. Early in my setup journey, I made the mistake of relying solely on regular C-clamps without considering the unique demands of glass. That oversight almost cost me my gear and safety.
Fortunately, I discovered that with the right tactics, mounting boom arms on glass desks can be safe and effective. Implementing proper support and choosing the right gear is crucial. Today, I want to share the top three safe tactics I’ve adopted—tactics backed by years of hands-on experience and industry insights—to ensure your gear stays secure without risking damage.
Is this mounting method really worth the effort? The biggest skepticism I hear
Many enthusiasts wonder if these specialized mounting methods are truly necessary, or if they’re just overkill for light setups. As I learned early on, neglecting proper mounting can lead to accidents—dropping a camera, damaging a delicate surface, or worse. A common mistake I made was using generic clamps that weren’t designed for glass, which increased the risk of slips. Trust me, investing in the right support systems has saved me countless headaches. For a more comprehensive understanding of supporting gear, check out this ultimate guide to C-stands and boom arms. Now, let’s explore the safest ways to mount your boom arm on a glass desk in 2026.
Choose the Right Support Devices
Start by selecting support gear designed for glass surfaces. Use rubberized clamps or mounting plates that distribute pressure evenly, reducing the risk of cracks or slips. I once used a set of silicone-lined C-clamps that grip firmly without scratching, which kept my microphone arm stable during a shoot. Pair these with adjustable support arms to adapt to your desk’s dimensions, preventing unnecessary stress on the glass surface.
Use Adhesive Pads or Mounting Plates
To further enhance stability, apply high-quality adhesive pads or mounting plates beneath clamps. These act as buffers, preventing direct contact that could cause slips or damage. During a recent podcast setup, I stuck a non-slip silicone pad between the clamp and my glass desk, which significantly improved grip and reduced wobbling, especially heavier gear or during vigorous movements.
Implement Weight-Based Stabilization
Adding weight to your support system increases friction and prevents sliding. Attach sandbags to support arms or support stands—think of it like anchoring a sailboat with heavy anchors during a storm. I used a pair of small sandbags on either side of my support arm, providing enough counterbalance to handle a heavy microphone and light, keeping everything steady without risking the glass surface. For more about stabilizing your gear, check out this stability boosting guide.
Leverage Non-Damaging Mounting Solutions
Consider using suction cups or specialized glass mounts that clamp securely without exerting excessive pressure. These tools work like suction cups on a car windshield—creating a firm hold without damaging the surface. I employed suction-based mounts for my lightweight light panels, which kept everything in place during windy outdoor shoots. Always ensure the suction cups are clean and properly attached for maximum hold. Explore this comprehensive support guide for more insights.
Regularly Inspect and Adjust Support Systems
Frequent checks and adjustments prevent slippage over time. Tighten clamps, reposition support arms, and replace worn pads as needed. After a particularly long shoot, I noticed my support arm was slightly slipping, so I re-tightened the clamps and added extra padding to restore stability. Think of this as tuning a musical instrument—small tweaks maintain harmony and safety. Routine inspection keeps your setup safe and reliable, especially when handling sensitive or expensive gear.
Combine Techniques for Optimal Security
Don’t rely on a single method—combine support devices, weight stabilization, and non-damaging mounts for maximum security. During my latest recording session, integrating all these strategies kept my microphone arm rock solid on a fragile glass surface, even during vigorous movement. Experimenting with combinations tailored to your gear and desk ensures a robust setup. If you’re interested in exploring more advanced mounting solutions, visit this ultimate guide to support gear for professional results.Many filmmakers and photographers assume that all camera support gear—tripods, C-stands, boom arms, and light stands—are created equal, leading to common mistakes that can compromise shot stability and safety. Let’s dig deeper into the nuances that often go unnoticed. Contrary to popular belief, investing in the most expensive gear doesn’t guarantee perfect stability. For instance, a common myth is that heavier tripods are automatically more stable; however, materials, design, and proper setup play crucial roles. In my experience, lightweight carbon fiber tripods can outperform bulky metal ones when paired with the right support techniques, as highlighted in expert guides on tripod stability.
One frequent oversight is neglecting the importance of correct tensioning and lock mechanisms. Many overlook that even high-quality support gear can become unstable if the locks aren’t properly engaged or if parts wear out over time. Regular inspection and maintenance are essential to prevent accidents. I once faced a close call when a Supporting arm unexpectedly collapsed because I hadn’t checked the tension screws after a long shoot—lesson learned.
How can advanced users ensure maximum safety without overengineering?
For seasoned professionals, the key lies in understanding load limits and stress points. Advanced support setups often involve integrating custom support solutions—like specialized support arms and sandbagging techniques—to distribute weight evenly and prevent tipping or collapse. For example, using support arms as detailed in the “Ultimate Guide to C-Stands and Boom Arms” can significantly improve stability. Moreover, leveraging non-damaging mounting solutions—such as suction cups or foam pads—and combining multiple stabilization strategies prevents the common pitfalls associated with support gear. For further insights, exploring articles on supporting gear options helps refine setup techniques.
One critical mistake I see among experienced crew is relying solely on support gear without considering environmental factors. Wind, uneven terrain, and other external forces can undermine even the most robust setups. Therefore, implementing supplementary stabilization like sandbags and ensuring the support gear is rated for the weight is vital. Research confirms that proper weight distribution and environmental considerations are essential for safety—something often overlooked in beginner tutorials but emphasized in professional best practices.
In summary, understanding the nuances of support equipment—such as materials, tensioning, environmental factors, and load management—can differentiate a good setup from a great one. Let’s challenge the misconception that support gear is foolproof and recognize the importance of regular checks and tailored solutions. Have you ever fallen into this trap? Let me know in the comments! For detailed support strategies, check out the ultimate guide to C-stands and boom arms.
Maintaining your camera rig, tripod, C-stand, boom arm, or light stand isn’t just about initial setup—it’s an ongoing process that ensures durability, safety, and professional results. Using the right tools and adopting regular maintenance routines can dramatically extend the lifespan of your gear and prevent costly failures during critical shoots.
Prioritize Regular Inspection and Cleaning
I always start my maintenance with visual inspections before each shoot. Checking for loose bolts, wear in support pads, and signs of corrosion helps catch problems early. A clean support system functions better; dust and debris can compromise grip and stability. I recommend using a compressed air duster and a microfiber cloth to keep components dust-free. For metal parts, a light application of lubricant like silicone spray keeps moving parts smooth, but avoid overuse to prevent residue buildup.
Tools That Make Maintenance Easier
Investing in specific tools can streamline your maintenance routine:
- Allen Wrenches: Essential for tightening bolts on support arms and support stands; I keep a set handy to address loosening screws.
- Lubricant Sprays: Silicone-based sprays prevent rust and keep moving joints operating smoothly. Use sparingly on support hinges and lock mechanisms.
- Cleaning Brushes: Small brushes help remove dust from tight spaces, preventing dirt accumulation that can cause wear.
- Replacement Pads and Grips: Over time, support pads compress or wear out. Stock some high-quality replacements to restore grip and protect surfaces.
Implement a Maintenance Schedule
Consistency is key. Set a routine—say, weekly or after intense shoots—to inspect and service your gear. During these sessions, tighten what’s loose, replace worn parts, and verify weight capacities. An often overlooked step is rechecking the integrity of support supports, especially after heavy or prolonged use. Regular upkeep ensures your gear performs reliably when it matters most.
Extend Longevity with Protective Accessories
Using protective accessories safeguards your investment. Slip-on rubber feet or protective sleeves on support stands help prevent floor damage and provide extra grip. Non-marking rubber pads under support claps prevent scratches on delicate surfaces, especially critical when working on glass desks. For larger support setups, consider adding support weight bags or sandbags—not only do they stabilize your system, but they also distribute stress more evenly, reducing wear on the main gear.
How Do I Maintain My Camera Support System Over Time?
Adopting a proactive approach is essential—regular inspections, cleaning, lubricating hinges, and replacing worn parts prevent unexpected failures. Keeping detailed records of maintenance routines helps track wear patterns, signaling when it’s time for upgrades or replacements. A comprehensive maintenance routine not only protects your gear but also gives you peace of mind during critical shoots. For example, routinely checking support clamps and tension screws, as recommended in expert guides, can prevent sudden collapses or slips on set. Consider trying a maintenance kit with specialty tools like precision screwdrivers and lubricants to keep your gear in pristine condition.
Remember, your support gear is an investment—treat it with care, and it will serve you reliably for years. Want to see how to build a support system that lasts? Check out this detailed guide for advanced support solutions. Start implementing a maintenance routine today, and experience smoother, safer shoots tomorrow.
Over the years, I’ve learned that even small details in support setups can make or break a shoot—especially when working with delicate surfaces like glass desks. A single slip or misjudged clamp can lead to gear topples or surface damage, costing time and money. My hope is that sharing these refined insights can help you develop a finely tuned support system that’s both safe and reliable, no matter the surface beneath.
Lessons That Challenged My Support Strategies
- Assuming Weight Matters More Than Support Quality: I once relied solely on heavy-duty clamps without considering their compatibility with glass, which resulted in slipping mid-shoot.
- Overlooking Environmental Factors: Wind or vibrations can undermine even the sturdiest setups—something I initially underestimated, leading to unintended gear movement.
- Underestimating Routine Checks: I thought a setup would hold indefinitely, only to find loose bolts after a long day. Regular inspections are non-negotiable for safety.
- Thinking One Solution Fits All: Combining non-damaging mounts with weight stabilization and surface buffers has transformed my support reliability.
Gear and Resources That Elevate My Support Game
- Silicone-Lined C-Clamps: These distribute pressure evenly and prevent scratches, highly recommended for glass surfaces.
- Non-Slip Silicone Pads: Essential buffers that increase grip without damage, available from specialty support suppliers.
- Adjustable Support Arms with Tension Control: Allow fine-tuning for perfect stability, especially important with uneven or fragile surfaces.
- Support Support Guides: For comprehensive tips, check out the ultimate guide to C-stands and support gear. It’s been a game-changer in my setup planning.
Embrace Continuous Improvement and Testing
Building a secure camera rig or light support on glass is an evolving process. Regularly revisit your setup, tighten what loosens, and adapt with new tools or techniques. Think of it as a creative process—each tweak brings greater confidence and safety. Don’t hesitate to experiment with combining different methods—more stability often equals more peace of mind, especially during dynamic shoots. Want to grow your support skills? Dive into this support setup guide to master the craft.
Remember, your support system is as vital as your camera or lighting. Investing in quality gear, maintaining routines, and refining your techniques over time will serve you well—turning uncertain setups into rock-solid foundations that propel your creative vision forward. Now, go ahead—adjust your supports today, and experience the difference in your next shoot!