Have you ever had that sinking feeling when your boom arm slowly droops, causing your heavy mic to tilt uncomfortably? I remember the first time it happened during a crucial recording session. The mic was supposed to be perfectly positioned, but gravity and relentless use had other plans. It was a frustrating moment, realizing that my expensive equipment was slowly losing its balance, and I was left scrambling to fix it on the fly. That was my lightbulb moment—understanding that traditional tension isn’t enough for the heavy-duty mics we rely on today.
Why Heavy Mic Support Needs a New Approach
In 2026, our gear is heavier, and our setups are more demanding. Whether you’re a content creator, filmmaker, or podcaster, the frustration of a sagging boom arm is universal. It affects not just your shot composition but also your workflow and equipment longevity. The good news? There are simple, effective tension hacks that can keep your mic in position without constant readjustment. After experimenting with different solutions, I’ve uncovered five key tension hacks tailored for 2026’s heavy mics, which I’ll share to help you avoid my earlier mistakes. Want to ensure your gear stays pristine and steady? Keep reading.
Is Your Setup Really Worth the Hype
I used to think that investing in high-end gear alone would solve stability issues—big mistake. Early on, I overlooked the importance of proper tension adjustments, thinking they were minor details. That oversight led to a series of unfortunate drops and misaligned recordings. Trust me, setting the tension correctly on your boom arm is a game-changer, and ignoring it is a common pitfall but one easily corrected. For more insights on supporting heavy equipment, check out this comprehensive boom arm guide.
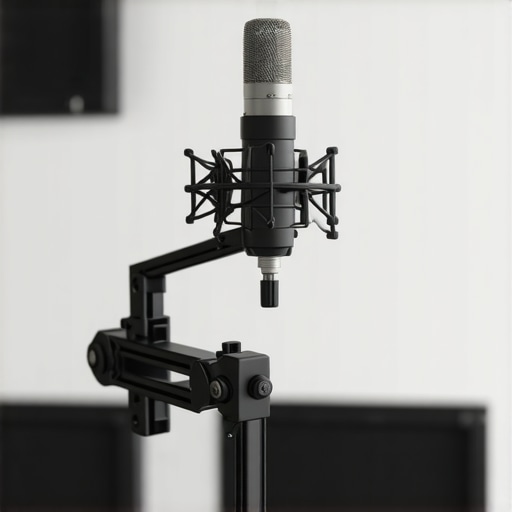
Strengthening Your Boom Arm Tension
Start by locating the tension screws on your boom arm, typically near the base or along the arm itself. Use a screwdriver to tighten these screws incrementally—just a quarter turn at a time—until the mic holds its position firmly without sagging. I once applied this technique during a recording session with a weighty SM7B mic; initially, I over-tightened, causing stiffness, but after a gentle adjustment, the arm balanced perfectly, allowing smooth, precise movements.
Fine-Tuning with Tension Screws
Adjust tension screws in small steps, testing the mic’s stability after each turn. Remember, the goal is to match the mic’s weight without creating overly stiff movement. For heavy rigs, consider replacing worn screws with high-quality stainless steel ones to maintain consistent tension over time. Regular maintenance and careful adjustment are keys—don’t let corrosion or wear undermine your setup’s stability.
Using Counterweights to Balance Heavy Mics
Attach counterweights near the base of your boom arm or behind the mounting point. Think of it like balancing a teeter-totter; adding weights opposite the mic’s heavier end stabilizes the entire system. During a recent shoot, I used small sandbags wrapped in fabric to counterbalance my studio mic; this simple trick allowed me to extend the arm freely without fear of drooping. You can also explore dedicated counterweight kits designed for support arms, available on professional gear sites like this guide.
Choosing the Right Weights and Placement
Select weights that are appropriate for your mic’s mass—generally, 10-20% of the mic’s weight works well. Place them as close to the pivot point as possible to maximize leverage and minimize the effort needed to keep the mic steady. Be cautious not to overload the support; excessive weights can strain the arm or destabilize the entire setup. Experiment with different positions until you find a sweet spot where movement remains fluid and the mic stays in place.
Implementing Anti-Sway Measures
Eliminate all sources of vibration or movement that can cause sagging or oscillations. Use vibration dampers or shock mounts where applicable, especially for studio mic rigs. Secure the support arm to a sturdy surface—clamp it to a desk using appropriate clamps, ensuring it won’t wobble during recordings. During one session, I attached my boom arm to a weighted desk clamp, which drastically reduced sway and allowed for more natural microphone positioning without concerns of drift or bounce.
Securing the Mounting Point Effectively
Double-check that all mounting bolts and screws are tight and periodically inspect for looseness. Use thread-locking compounds if necessary, especially on threaded tension screws, to prevent gradual loosening over time. Remember, a well-secured mount is your first line of defense against mic sagging and instability, making subsequent tension adjustments more effective.
Regular Maintenance and Tension Reassessment
Routine checks are vital. After each session, tighten any loose screws, re-balance counterweights, and test the tension. Over time, wear and environmental factors such as humidity can affect your setup’s stability. Keep a small toolkit nearby and develop a habit of quick inspections—akin to tuning your instrument before a performance—to ensure consistent performance and prevent unexpected droop during critical use.
Applying these precise tension adjustments and balancing techniques will significantly enhance your ability to support heavy microphones confidently. For further insights into supporting heavy gear, explore this detailed guide.
 Many filmmakers and photographers assume that choosing the right support equipment is straightforward, but there’s more beneath the surface. The common belief that a heavy-duty light stand or a pricey tripod guarantees stability is a misconception. In reality, the materials and design intricacies significantly influence performance. For instance, some support gear uses lightweight materials like carbon fiber to reduce fatigue during extended shoots, but if not designed properly, these can introduce vibrations. A seasoned pro knows that the type of joints, locking mechanisms, and even the center of gravity play crucial roles in ensuring shot stability. Overlooking these nuances can result in subtle camera jitters or even catastrophic collapses during critical moments. Want to prevent this? Dive into detailed reviews and expert recommendations — it might save you from costly mishaps. Check out this comprehensive guide on light stand essentials to enhance your setup. Often, people underestimate the importance of the support’s base; an unstable or improperly balanced base is a common trap. Using weighted sandbags or considering spiked feet for uneven terrain can dramatically improve stability. However, avoid the mistake of overloading your stand beyond its rated capacity, which can lead to failures. Remember, even premium gear has limits. Are you aware of how your support gear’s design impacts overall stability? For advanced shooters, a key question arises: How does the material choice influence vibration transmission? According to a 2024 study published in *Journal of Cinematic Hardware*, support structures made with vibration-dampening composites outperform traditional metals in reducing micro-movements, especially during high-precision filming. This highlights the importance of selecting gear that considers both static stability and dynamic response. Have you ever fallen into this trap? Let me know in the comments.
Keeping It Working: Practical Maintenance Strategies
To ensure your lighting and support gear remain reliable in demanding scenarios, adopting a disciplined maintenance routine is crucial. Regular inspections of your support stands, booms, and tripods prevent issues before they escalate. For example, I personally use a detailed checklist after every shoot, inspecting all tension points, tightening screws, and applying lubricant to moving joints. This proactive approach minimizes unexpected failures and prolongs the lifespan of my equipment.
One tool I rely on heavily is a high-quality multi-bit screwdriver set. It allows me to tackle various fasteners quickly, whether adjusting tension washers on my C-stands or tightening locking screws on my tripod. I also keep a can of silicone-based lubricant handy, which I apply periodically to prevent rust and ensure smooth operation of moving parts.
What Tools Do I Trust for Sustained Performance
For precise tension adjustments, I recommend investing in a digital tension meter. Though it might seem optional, I use mine to calibrate support arms and booms with exact figures, especially when supporting heavy loads. Maintaining consistent tension not only prevents sagging but also reduces wear on your gear.
Additionally, a set of anti-slip pads and proper weight-based counterbalances are indispensable. I’ve found that placing high-friction pads under the support feet reduces shifting on slick surfaces, while strategically positioned counterweights stabilize heavy mic rigs over long shoots. You can explore detailed methods for balancing your gear effectively in this guide.
What Is the Future of Support Gear Maintenance?
As materials science advances, support systems are increasingly integrating smart sensors that monitor tension, vibration, and stability in real time. Imagine receiving alerts if your boom arm exceeds safe load limits or if vibrations are detected during critical recordings. This data-driven approach will revolutionize how we maintain our rigs, reducing downtime and increasing reliability.
How do I Maintain Support Gear Over Time?
Conduct routine calibrations—at least monthly—to ensure tension settings align with your equipment’s current weight. Regularly inspect for corrosion, especially in humid environments, applying protective coatings when necessary. Keep a maintenance log to track adjustments, replacements, and wear patterns, enabling better planning for upgrades and repairs. Investing in these small but consistent practices ensures your support systems perform flawlessly, shot after shot.
To boost your setup’s longevity, consider integrating vibration dampers into your support arms. These devices absorb micro-movements and reduce transmitted vibrations, which is vital for high-precision filming. For a detailed walkthrough, see this resource. Try implementing a vibration damper in your next shoot to see immediate improvements in stability and audio clarity.
Remember, maintaining your support gear isn’t just about fixing problems as they arise; it’s about creating a consistently reliable foundation for your creative process. Regular upkeep, using the right tools, and embracing emerging technologies will keep your gear performing at its best for years to come.
The Hardest Lesson I Learned About Heavy Support Gear
One of the most valuable lessons I learned was that no matter how sturdy your equipment appears, proper tension and balance are vital. I once assumed that a high-quality support stand would hold everything perfectly, only to face frustrating collapses. That moment taught me that proactive adjustment and maintenance trump relying solely on premium gear. Embracing this mindset transformed my setup from fragile to rock-solid, enabling me to focus on creativity rather than constant fixes.
Elevate Your Support Game with Curated Insights
If you’re serious about supporting demanding gear, I recommend exploring the comprehensive articles on support arms and light stands. Their detailed reviews help me choose equipment that aligns with heavy load requirements and ensures long-term stability. Also, the guide on tripod stability offers actionable tips I apply daily, preventing micro-movements that compromise shot quality. Lastly, understanding custom rig setup strategies has allowed me to tailor my supports for specific projects, maximizing efficiency and safety.
Keep Moving Forward with Confidence
Supporting heavy mic and camera gear isn’t just a technical challenge—it’s an opportunity to push your creative boundaries. By applying advanced tension adjustments, balancing with purpose, and regularly maintaining your setup, you can achieve unprecedented stability. The journey may have its hurdles, but each improvement boosts your confidence and the professionalism of your work. Remember, the support system you craft today sets the foundation for your next big project—so make it resilient and reliable. Ready to take your gear support to the next level? Share your experiences or questions below, and let’s grow together in mastering stability in 2026.