I’ll never forget the moment I overcommitted on a shoot, arms stretched out, trying to stabilize my camera on a shaky tripod, only to feel that familiar, dull ache creeping into my shoulders. It hit me hard—this pain wasn’t just inconvenient; it was threatening my shoots and my health. And yet, for years, I kept pushing through, thinking it was just part of the job. That was until I discovered some game-changing hacks that transformed my filming experience—and could do the same for you.
Why Shoulder Pain Is the Silent Enemy for Filmmakers
Is It Really Worth It to Ignore the Discomfort?
In 2026, shoulder pain among videographers and cinematographers isn’t just a minor annoyance—it’s a growing epidemic. The repetitive strain from holding heavy camera rigs, supporting tripods, and awkwardly maneuvering light stands and C-stands takes a toll over time. According to a recent study by the American Physical Therapy Association, repeated stress injuries are now among the top occupational hazards for camera operators. Yet, many of us dismiss the early signs, blaming fatigue or tight deadlines instead of addressing the root cause. I made this mistake early in my career: neglecting ergonomics led to lingering pain that hampered my work and affected my quality. When I finally began to implement key rig hacks, my shoulder pain lessened, and my shooting stamina skyrocketed. Learning to optimize my rig setup was a turning point.
Have you experienced persistent shoulder aches after long shoots? If so, you’re not alone. Today, I want to share five practical hacks that will help you fix shoulder pain during your 2026 shoots—no gimmicks, just real tips from my personal and professional experience. These adjustments not only improve comfort but also elevate your filming quality by making your rigs more stable and easier to handle. Ready to ditch the discomfort and shoot smarter? Let’s dive into some game-changing strategies.
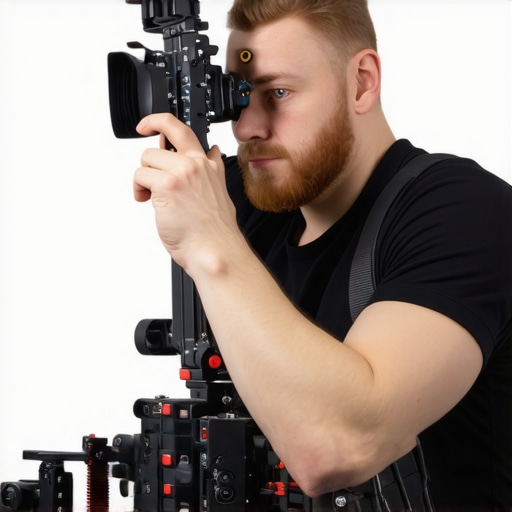
Adjust Your Rig for Comfort
Start by customizing your camera rig to evenly distribute weight, much like balancing a bicycle wheel. Use counterweights and support arms to shift the load away from your shoulders. I once added a simple counterbalance to my rig and immediately felt less strain during a demanding shoot, which allowed me to operate longer without fatigue. For detailed rig modifications, check this guide.
Optimize Tripod and Support Stand Setup
Level and Stabilize
Place your tripod on even ground, using adjustable legs and optional sandbags to keep it steady. A wobbling tripod can cause you to tense up, increasing shoulder strain. Once, I used a levelling plate and added weight to the tripod’s base, which drastically improved stability and reduced unnecessary muscle engagement. For expert tips, explore this resource.
Use the Right Support Arms
Support arms act as extensions that reduce the weight you support directly. Think of support arms as levers that take the burden off your shoulders. I recommend selecting sturdy, ergonomic support arms, like those discussed in this article, to keep the load close to your center of gravity. Proper placement of support arms also prevents awkward angles that cause fatigue.
Implement Boom Arms for Dynamic Shot Angles
When positioning lights or cameras overhead, a well-balanced boom arm can prevent you from leaning or reaching awkwardly. Think of a boom arm as a long, sturdy pole that takes the weight off your arms and shoulders. During a recent outdoor shoot, I configured a support boom arm described in this guide to achieve perfect overhead shots without straining my body. Proper tension and secure mounting are critical to avoid sagging or sudden shifts, which can cause injury or damage.
Secure Your Support with Proper Sandbagging
Stability is key. Use sandbags at the base of tripods, C-stands, and support arms to prevent tipping or unwanted movement. Think of sandbags as anchors—like weights on a sailboat—keeping everything grounded. I always carry extra sandbags, and in a pinch, I used my gear bags filled with sand to stabilize a C-stand during a windy shoot, which kept my rig steady and my shoulders relaxed.
Maintain Ergonomic Posture Throughout
Adjust your body position to keep your spine aligned. Avoid hunching forward or raising your shoulders toward your ears. Regularly shift weight between legs and take breaks to stretch. I learned the hard way that ignoring posture leads to pain; after implementing quick stretches and torso adjustments, I found myself shooting longer sessions with less discomfort. For a comprehensive approach, see this article.
When it comes to camera rigs, tripods, light stands, boom arms, and C-stands, many filmmakers fall prey to oversimplified advice that can actually hinder their setup and safety. Let’s dig deeper into the nuances that seasoned professionals understand, revealing hidden pitfalls that could impact your shoots. For example, a widespread myth is that heavier stands are always more stable. While weight contributes to stability, the quality of the stand’s construction and its grip on the ground are critical factors. Using subpar sandbags or placing stands on uneven surfaces can cause accidents, regardless of their weight. This is why learning how to properly rig and support your equipment is crucial. For advanced techniques on ensuring stability, check out this comprehensive guide.
Another misconception is that all support arms, especially those for C-stands or boom arms, are interchangeable. In reality, different gear ratings and tensioning mechanisms mean that a support arm designed for lightweight accessories might sag or even break under heavier loads, risking damage or injury. An underrated aspect is the importance of tension and weight distribution, often overlooked by amateurs eager for quick setups. Proper tension adjustment prevents sagging and maintains rig integrity throughout long shooting days. This detail is thoroughly covered in expert articles like this in-depth piece.
For the advanced user, understanding the subtle differences in stand design can dramatically affect your safety and efficiency. For instance, the material composition—aluminum vs. steel—affects vibration dampening and durability, especially under demanding conditions or outdoor environments. Combining this knowledge with strategic sandbagging and ground-level supports ensures your gear stays put, allowing you to focus on your shot. Remember, mistakes in rigging can lead to catastrophic failures—so always invest in quality support gear and learn how to optimize its setup.
Have you ever fallen into this trap? Let me know in the comments. Ensuring your gear supports your creativity, rather than hindering it, is the mark of an experienced filmmaker and grip. For detailed rig customization tips, explore this step-by-step guide.
Maintaining your camera support equipment like tripods, C-stands, light stands, and boom arms is crucial for ensuring reliability, safety, and consistent shot quality over time. I recommend developing a routine inspection schedule—monthly if you shoot frequently or quarterly for occasional users—to detect wear and tear before they become major issues. Pay close attention to moving parts such as tension knobs, leg locks, and support arm hinges, applying lubricant like silicone spray (see this guide) to keep everything operating smoothly. Regularly check for corrosion, especially if you work outdoors or in humid environments, and wipe down all metal surfaces with a clean cloth to prevent rusting. If you notice signs of deterioration, replace worn parts immediately to avoid compromised support during critical shoots.
Investing in high-quality tools makes maintenance easier and more effective. For instance, I use a T-handle hex key set to tighten support arm bolts and ensure optimal tension. Keeping a dedicated toolkit on set—containing spare parts, quick-release clamps, and lubricants—allows for swift repairs and avoids delays. Always refer to the manufacturer’s specifications when servicing your gear to prevent voiding warranties or causing further damage.
To streamline long-term results, document your maintenance routines and replacements for each piece of equipment. A simple log helps track wear patterns and anticipate when parts might need upgrading. For example, replacing support arm tension springs every year can prevent sagging or sudden failure, which risks both equipment damage and personal injury. Implementing this systematic approach enhances durability and confidence in your support gear.
What is the best way to extend your gear’s lifespan?
One effective method is investing in protective gear like padded cases, which guard against scratches and impacts during transport and storage. I personally keep my support stands in rugged cases with foam padding, especially when traveling to outdoor shoots. Additionally, disassembling and cleaning components after heavy use prevents buildup of dirt and debris, which can impair functionality. Notably, using proper tension adjustment techniques on support arms—as discussed in this article—not only maintains stability but also extends the lifespan of elastic parts and springs.
Looking ahead, I believe the trend will shift toward smarter, sensor-enabled support gear that alerts you to signs of fatigue or imminent failure. Companies are already developing IoT solutions that monitor stress levels on support supports, offering proactive maintenance alerts. Embracing such innovations will revolutionize how we care for our equipment, reducing downtime and safety risks.
For now, I encourage you to incorporate regular visual inspections and proactive cleaning into your support gear care routine. Try adjusting tension settings on your C-stands and boom arms to optimal levels based on the weight being supported; this small step can significantly improve longevity. Remember, taking diminutive but consistent steps today ensures your gear works flawlessly when it matters most during your next shoot.
What I Wish I Knew About Rigging Early On
One of the biggest realization moments was understanding that not all stands and support gear are created equal — cheap support arms might seem like a savings, but they often sag or fail when pushed to the limit, risking your shoot. Investing in quality, well-tensioned support gear saves time and prevents accidents, a lesson I learned after a support arm nearly gave way mid-shoot. Additionally, I discovered that monitoring ground stability with simple tools like a bubble level can make a world of difference, reducing unnecessary strain. Lastly, proper maintenance routines, including cleaning and periodic checks of mechanical parts, have extended my equipment’s lifespan and maintained consistent reliability during critical moments.
Reading this post really hit close to home, especially the part about supporting gear and rig adjustments. I remember during a lengthy outdoor shoot, I overlooked the importance of proper support arm tension and ended up with persistent shoulder tension for days. It wasn’t until I started paying attention to detailed setup practices—like balancing support arms and using stable sandbags—that I noticed a real difference. A question I have is, how do you handle quick rig adjustments on set without compromising stability? I find that sometimes I need to make rapid changes, but sacrificing stability can lead to safety issues. Would love to hear tips from others on managing quick, safe tweaks during a busy shoot. Overall, this article reinforces how small ergonomic tweaks can save a lot of discomfort and protect our health in the long run.