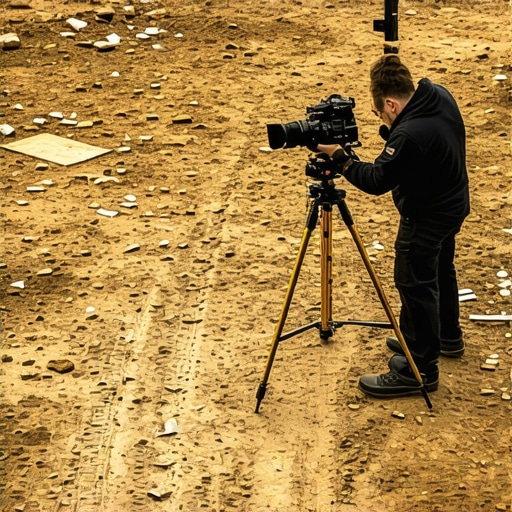
It was late afternoon on a busy set, sunlight filtering through the windows, when I realized my heavy cinema tripod was wobbling like a drunken sailor. No matter how carefully I adjusted the legs, the uneven floor made the entire shot feel shaky and unprofessional. That moment hit me hard—why was I struggling with something that should be straightforward? I knew there had to be a better way to level and stabilize my gear on these unpredictable 2026 sets.
Why Stabilizing Heavy Tripods Matters More Than Ever
As filmmakers, we often overlook the importance of proper stabilization, especially when working with hefty camera rigs. The weight of modern cinema equipment demands a solid foundation. Uneven sets, whether due to flawed flooring or outdoor terrain, can turn a smooth shot into a shaky disaster. Early on, I made the mistake of ignoring the ground conditions and relying solely on the tripod’s built-in adjustments, which isn’t enough. According to a recent study by CineForm, unstable rigs can reduce image quality and force costly reshoots—something nobody wants.
Have you ever faced a similar problem where your tripod just wouldn’t sit flat on the ground? If you’re nodding yes, keep reading. I’m about to share practical tips that will transform how you approach filming on uneven terrain.
Is Stabilization on Uneven Sets Really Worth the Extra Effort?
When I first started, I thought compensating with the tripod’s adjustable legs alone was enough. Spoiler: it’s not. The mistake I made early on was overlooking grip techniques that secure the tripod better on uneven ground. Implementing proper grip tactics can make a huge difference in shot stability and camera safety. Want to learn more about the specific grip hacks that elevate your setup? Check out https://stands.creatorrigreviews.com/rigging-c-stands-on-uneven-ground-4-pro-grip-hacks-for-2026.
Now, let’s dive into how you can confidently level your heavy cinema tripod no matter the set’s terrain. The stakes are high, but the solutions are simpler than you think.
Nail Down the Ground Before Extending Your Tripod
Start by assessing the terrain—pick the flattest spot possible. Imagine your tripod as a ship; anchoring it on a stable surface prevents unwanted wobbles. I recall a shoot where I ignored a small ridge, only to see my shot shake during a crucial take. To fix this, I repositioned the legs onto the flatter ground, which instantly stabilized the setup. Use a spirit level on the head to verify flatness, adjusting each leg until the bubble centers. This initial step sets a strong foundation for the rest of your stabilization process.
Use Strategic Blocks and Sponges to Level Legs
When the ground is uneven, place sturdy objects—like bricks, wood blocks, or even stacked sandbags—under the tripod’s legs to level them. Think of your tripod as a tripod-like tower in a game—you need to balance the legs equally. On a recent outdoor shoot, I used small wooden blocks beneath two legs and a sponge under the third to achieve a perfect level. Ensure the blocks are stable; avoid shifting during your shoot. This quick fix can make a significant difference, especially when you don’t have access to proper adjustable tripods.
Implement Tension and Grips for Secure Contact
Apply grip pads or rubber mats under the tripod feet to prevent slipping on slick or smooth surfaces. Remember, even a slight breeze or footstep can cause wobble if your setup isn’t firm. I once shot on a polished warehouse floor, and adding rubber pads to the feet stopped any movement. Additionally, use grip tape around the tripod legs for extra hold on rough terrain. Securing the bottom contact points guarantees your rig stays put, allowing you to focus on your shot without constant readjustments.
Leverage Stabilizers and Weighting Techniques
Weight down your tripod with sandbags or heavy objects—imagine adding ballast to a boat. Place bags over the center column or hang weights from the tripod’s hook. I had a shot on a windy day, and hanging a sandbag from the center hook stabilized the entire rig. Be cautious with the placement; too much weight on one leg can shift the balance. Distribute weight evenly to prevent tipping. This method is especially effective in outdoor environments with wind or on uneven, loose soil.
Use a Tripod Stabilizer or Spreader
If your tripod has a built-in spreader, open it fully to lock the legs in place, increasing rigidity. For models without spreaders, consider attaching a portable one or creating a DIY version with sticks or clamps. Think of it as braces for a building—adding extra support prevents legs from splaying or wobbling under load. On one shoot, I attached a makeshift spreader with a rubber band and some clamps; although temporary, it dramatically improved stability. External stabilizers distribute force and reduce vibrations transmitted to the camera.
Double-Check and Fine-Tune Your Setup
Once everything is in position, revisit your level and adjust as needed. Tighten all tripod locks firmly—imagine screwing down a bolt to prevent movement. Use a bubble level on the camera or tripod head to spot slight misalignments. Small adjustments can make a world of difference, especially for long takes. Remember, stability is an ongoing process; continuously monitor and re-tighten during shoots to maintain perfect shots, even amid changing conditions.
Applying these techniques transforms shaky footage into professional-quality images. Remember, in filmmaking, stability isn’t just about equipment—it’s about your approach and attention to detail. Want more in-depth tips? Check out this comprehensive guide to tripod stability.
Often, filmmakers focus on the flashy aspects of gear—cinema cameras, lighting setups, or high-tech rigs—while overlooking the subtle intricacies that truly determine stability and safety. Many believe that selecting a C stand or light stand is straightforward, but in reality, the real mastery lies in understanding the hidden nuances that separate amateur setups from professional precision. Let’s dig deeper into what most people miss and how you can avoid common pitfalls.
What Everyone Gets Wrong About C Stands and Boom Arms
A prevalent misconception is that all C stands or boom arms are created equal. In truth, the differences in build quality, material, and locking mechanisms can dramatically affect stability. Cheap or outdated models often have weaker clamps or plastic components that can bend under load, risking weight drops or, worse, injury. This is why investing in professional-grade gear, as discussed in this guide, is crucial.
Another often overlooked detail is the importance of correct assembly. Many users neglect to properly tighten all locking knobs or fail to check for uneven weight distribution. This seemingly minor oversight can lead to unexpected collapses, especially when supporting heavy modifiers or lights. Regularly inspecting and re-tightening your gear goes beyond initial setup—it’s a safety measure that guarantees reliability.
Are Light Stands Actually Designed to Support Heavy Equipment?
A common myth is that light stands are merely for small fixtures. However, using a standard light stand for large modifiers or LED panels without verifying its weight capacity is a gamble. Heavy-duty stands with reinforced bases and adjustable sections are engineered for precise support. Skimping on this can result in toppling or bending, compromising your shoot and safety. Always match your stand’s capacity with your gear, and consider spreading the load across multiple supports when necessary.
Common Traps That Lead to Budget-Related Dangers
One insidious mistake is opting for the cheapest support gear to save money. While frugality is understandable, low-cost stands or grips may lack essential locking mechanisms or use inferior materials prone to fatigue. This is especially dangerous on location, where uneven terrain or unexpected wind can test your setup. Remember, investing in quality support gear—such as sturdy C stands or heavy-duty support arms—pays off in safety and peace of mind.
How Can Understanding Gear Nuances Elevate Your Filmmaking?
Recognizing and respecting the subtle differences in support equipment allows you to craft more reliable and professional setups. It involves checking for manufacturing flaws, understanding load limits, and selecting accessories designed for your specific needs. For example, appropriately weighted C stands with tight-locking mechanisms prevent sagging during long shoots, as highlighted in this resource. Mastery over these details reduces the risk of accidents, improves shot stability, and ultimately elevates the production quality.
To avoid these common but costly mistakes, always choose gear from reputable brands, perform regular inspections, and stay informed about the best practices. For comprehensive tips on stabilizing your gear, check out this detailed guide. Have you ever fallen into this trap? Let me know in the comments, and together we can build safer, more professional setups.In the demanding world of filmmaking, having dependable support equipment is essential for achieving professional results. Investing in quality tools not only enhances stability but also extends the lifespan of your gear. Personally, I rely heavily on a few key pieces that have proven to be game-changers in my workflow. First and foremost, a sturdy C stand is indispensable. I prefer models with a robust base, lockable casters, and adjustable arms, such as those highlighted in this guide. These stands provide the stability needed for heavy lights or modifiers, especially when working on uneven terrain, and their durability ensures longevity.
Another tool I swear by is a high-quality boom arm. A well-designed boom arm, like the ones detailed in this article, allows for flexible positioning of lights or microphones while maintaining balance. I particularly appreciate models with adjustable tension screws, which help prevent sagging under heavy loads. To maintain these tools over time, regular lubrication of moving parts and inspection for wear and tear are crucial. Using a silicone-based lubricant on joints and locking mechanisms can prevent squeaks and maintain smooth operation.
For supporting lights, a reliable light stand is a must. I recommend those with wide bases and locking mechanisms that resist slipping, such as those discussed in this post. Proper storage—such as hanging stands in a dry, protected space—also prolongs their lifespan and keeps them ready when needed.
When it comes to camera rigs and tripods, precision matters. My personal choice is a tripod with a fluid head, which offers smooth pans and tilts. Regular maintenance includes tightening screws, cleaning contact surfaces, and verifying balance before each shoot. A tip from this technical guide emphasizes the importance of periodically recalibrating your tripod to prevent drift and jerkiness.
Looking ahead, the trend is moving toward modular, easily adaptable support systems that can be customized for different environments. Quick-release mounts and lightweight but durable materials will dominate, making setups faster and more efficient.
If you want to elevate your support game, challenge yourself to regularly inspect your gear, apply appropriate lubricants, and consider upgrading to modular systems. For an immediate improvement, try adjusting the tension screws on your boom arm to prevent sagging—small tweaks that can hugely impact the quality of your shots. Ready to take your setup to the next level? Dive into these advanced practices today.
The Hardest Lesson I Learned About Support Gear in Filmmaking
One of the most profound lessons I learned involved overlooking small details that make or break shot stability. Early on, I believed that investing in high-end C stands and support arms was enough, but I soon discovered that proper setup, tie-offs, and regular maintenance are equally crucial. It took a few costly takes and some near-accidents to realize that attention to detail and ongoing vigilance are what truly ensure safety and stability—lessons that can’t be replaced by high price tags alone.
Top Tools That Elevated My Support Setup
Over the years, I’ve come to trust a handful of tools and resources that keep my gear steady. My go-to is a heavy-duty C stand with a reinforced base—found to be more reliable during outdoor shoots, especially on uneven terrain. I also swear by quality support arms detailed in this guide for their adjustability and durability.
For quick fixes and ongoing maintenance, lubricants and grip pads are irreplaceable. I regularly inspect and replace worn components, ensuring my support gear performs under pressure. These small, consistent steps prevent surprises during critical moments. Lastly, I swear by modular support systems that adapt quickly, saving precious setup time and reducing fatigue—that’s why I recommend exploring these versatile options to my peers.
Take Action to Protect Your Support Equipment
Don’t wait until instability causes a shoot to go awry. Regularly evaluate your gear, invest in quality support equipment, and refine your setup techniques. Remember, safety and shot stability boil down to your attention to detail and commitment to ongoing learning. By applying these personal insights and trusted tools, you’ll develop support structures that stand the test of time and terrain. Ready to elevate your filmmaking stability? Dive into this comprehensive guide and start transforming your support game today.