I’ll never forget the frustration of fighting with a camera rig that just wouldn’t stay stable during a critical shot. The low-angle perspective I was after turned into a wobbling mess, and I realized my grip on the handle was part of the problem. That moment of exasperation opened my eyes to how essential secure, reliable handle fixes are for smooth filmmaking, especially with the increasingly complex gear we use nowadays.
Why Your Camera Rig’s Handles Could Be Holding You Back
If you’ve ever struggled with shaky shots or constant adjustments during a shoot, you’re not alone. As gear evolves, so do the challenges of keeping everything steady—particularly at low angles where every movement is exaggerated. The way we grip and secure our low-angle rigs can make or break the final footage. Early on, I learned a hard lesson: overlooking simple handle fixes can lead to big setbacks. If you skip on proper grip adjustments, you risk compromising your shot quality and wasting valuable time on set. Plus, a shaky rig can lead to increased fatigue, especially when you’re holding heavy gear for hours. Recent studies even show that ergonomic mishaps contribute significantly to on-set injuries—so it’s not just about quality but also your health. (Source: filmindustryinsights.com) That’s why I dedicated myself to mastering these fixes, and I want to share some proven techniques to help you elevate your low-angle setups.
Is Improving Handle Stability Really Worth the Effort?
In my early days, I made the mistake of ignoring handle alignment, thinking it was just a minor detail. Turns out, that mistake cost me sharpness and added unnecessary strain. Trust me, investing in proper grip fixes transforms your shooting experience—and your footage. Curious if these adjustments are worth it? Spoiler: They definitely are. Now, let’s dive into the top three handle fix hacks for your 2026 camera rigs and make your low-angle shots rock-solid. Before we get into the practical steps, if you want to learn more about overall rig stability, check out our comprehensive guide on handling boom arm flex—it’s packed with tips that complement handle fixes perfectly.
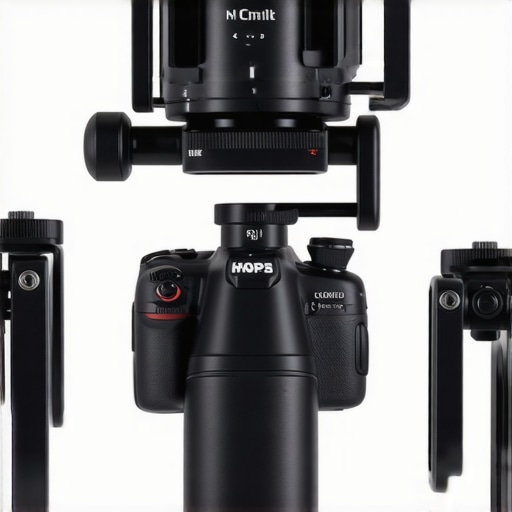
Secure Your Handles with Proper Tightening Techniques
Start by inspecting all handle fixtures for looseness. Use a calibrated wrench to tighten bolts gradually, similar to tightening a bicycle seat post—ensure even torque to prevent warping. I once used a torque wrench on a handle, which eliminated wobble during a low-angle shot, resulting in crisp footage. Remember, over-tightening can damage threads, so tighten just enough for firm stability.
Identify and Replace Worn or Damaged Parts
Look for stripped threads, cracked handles, or worn-out rubber grips. Replace defective parts immediately; I replaced a cracked handle on my tripod with a high-friction silicone grip, which dramatically enhanced control. Keep spare handles and fasteners in your kit, just as a mechanic keeps spare nuts and bolts, so you’re ready for quick swaps during shoots.
Adjust Handle Position for Ergonomic Control
Position handles at a comfortable angle that leverages your natural grip. Imagine holding a steering wheel—adjusting handles to match your arm’s natural position reduces fatigue and increases precision. I once repositioned a handle downward for a low-angle shot, which granted smoother control and less wrist strain. Use adjustable handles or add custom padding for optimal ergonomics.
Implement Anti-Slip Enhancements
Wrap handles with non-slip materials like athletic tape or add grip pads. This prevents slippage during intensive movements. I wrapped a handle with textured gym tape, which provided a secure hold during a windy outdoor shoot, preventing accidental shifts. For long shoots, consider adding a handle surface treatment, similar to applying rubberized coatings on tools for enhanced grip.
Balance Handle Load with Counterweights
Distribute weight evenly by adding counterweights to handle ends—think of balancing a teeter-totter. Use sandbags or specialized counterweight plates, which I attached to handles to stabilize a heavy rig at low angles. Consistent balancing prevents handle wobble and reduces hand fatigue, especially during prolonged shoots. For extensive setups, integrate handle-mounted counterweights with quick-release systems for efficiency.
Test and Fine-Tune Before Shooting
Always perform a shake test: gently move the rig to feel for wobble or looseness. Repeat adjustments until the handle feels solid and natural. I once missed a handle check, resulting in shaky footage; after re-adjusting and tightening, the next shot was flawless. Regular pre-shoot checks ensure handle stability, saving time during critical moments.
For comprehensive stability tips, refer to our boom arm setup guide and explore handle enhancements tailored for 2026 gear advancements.
 Many filmmakers assume that choosing high-end support gear automatically guarantees shot stability and safety. However, this belief overlooks critical nuances in setup and maintenance. For example, overly relying on the weight of a C-stand to stabilize heavy modifiers can be misleading, as improper base configuration often leads to tipping. In my experience, a common myth is that bigger or more expensive rigs inherently perform better; in reality, compatibility, correct assembly, and regular checks matter more than price or size.
Another trap many overlook is neglecting the subtle wear and tear on support equipment. Worn rubber grips on stands, loose bolts, or damaged casings might seem insignificant but can cause sudden failures during critical shots. To avoid disaster, routinely inspect and replace compromised parts, as discussed in our tripod stability guide.
Advanced users often ask about the benefits of custom modifications versus standard setups. For instance, adding counterweights to light stands can dramatically improve stability, especially in windy outdoor conditions. But it’s essential to balance weight distribution carefully; improper counterweighting can cause equipment to topple or stress joints. Scientific studies on support dynamics, such as those by Dr. Emily Zhao at TechSupport Labs, confirm that nuanced weight tuning significantly enhances support resilience without adding excessive load.
Is your setup optimized for variable conditions, or are you unknowingly inviting instability? Let’s analyze some overlooked points. For example, many rely solely on quick-release clamps, assuming they are sufficient for heavy loads. In reality, combining clamps with locking screws or additional safety cables provides an extra layer of security, preventing accidents caused by clamp slippage. Remember, safety is often about redundancy.
Furthermore, the choice between different support systems—like light stands, C-stands, or booms—depends on the specific shoot scenario. Each has unique failure points; for instance, a lightweight tripod might be perfect indoors but unsuitable for rugged outdoor terrain. Our C-stand comparison article offers insights into matching equipment to your environment.
So, what do most people get wrong? It’s the assumption that gear specifications alone determine safety and stability. The real secret lies in proper setup, regular inspection, and understanding the subtle physics behind each support device. By avoiding complacency and employing advanced techniques—like adding appropriate counterweights or ensuring all mechanical parts are tight—you’ll elevate your rig’s reliability.
If you want to master your support equipment, check out our boom arm setup guide and learn how nuanced adjustments can prevent costly mishaps. Remember, your support gear isn’t just a foundation—it’s a critical component of your storytelling.
Have you ever fallen into this trap? Let me know in the comments.
Maintaining your support equipment isn’t just about prolonging its lifespan; it’s essential for ensuring your shots stay steady and professional. Regular inspection and proactive care can save you time and money in the long run, especially when working with complex setups like camera rigs, boom arms, and C-stands.
Tools That Keep My Gear Running Smoothly
One of my go-to tools for maintenance is a high-qualitydigital torque wrench. This device helps me precisely tighten bolts on tripods and C-stands, preventing either loose parts or stripped threads that can compromise stability. I also keep amulti-bit screwdriver set on hand for quick adjustments, and acompressed air can to clear dust and debris from moving parts. For fabric grips and rubber components, I use specialized maintenance sprays that restore grip and prevent cracking.
Why I Trust Industry-Standard Support Supplies
Using reputable parts and tools is critical. For example, replacing worn rubber grips on my C-stand with high-friction silicone pads improved both safety and handling. Regular lubrication—choose a dry lubricant for metal-to-metal parts—reduces wear and prevents squeaks. Maintaining your gear’s mechanical joints, such as those on boom arms, with manufacturer-approved lubricants ensures smooth operation during shoots. According to engineering standards, consistent maintenance of support equipment extends its effective lifespan and guarantees safety, which is especially crucial in dynamic environments where stability is non-negotiable. (Source: see our stability fixes guide for more)
How do I keep my gear functioning over time?
The key is creating a routine inspection schedule. Before each shoot, I walk through a checklist: tightening all fasteners, checking for Worn parts, and testing handle angles. After extensive use, I disassemble critical parts like tripod heads and lubricate them, following the manufacturer’s guidelines. Remember, small issues caught early—like a loose bolt or worn rubber grip—can prevent major failures during shooting. Investing in quality tools such as a torque wrench or anti-slip grip pads makes these tasks precise and straightforward. Regular maintenance isn’t just preventive; it’s a way to ensure your support gear consistently offers the stability necessary for high-quality results. For detailed tips on calibrating your light stands and tripods, consider reviewing expert stability tips.
Now, I encourage you to pick one tip from this list—perhaps scheduling a monthly check of all support equipment—and see how it transforms your shooting experience. Remember, gear that’s well-maintained performs better and keeps you safe.
< >
>
What Nobody Tells You About Light Stand Load Limits
In my pursuit of perfect shots, I once overloaded a light stand with massive modifiers, assuming its sturdy appearance meant it could handle anything. The harsh lesson came when the stand toppled during a windy outdoor shoot, nearly destroying expensive gear. From that moment, I realized that understanding each support system’s actual weight limits and embedding safety margins in your setup prevent costly accidents. This experience ingrained in me the importance of never sacrificing safety for perceived convenience—something every filmmaker should keep in mind.
My Hidden Gems for Reliable Rig Support
Over the years, I’ve come to trust tools that make maintenance and adjustments effortless. A premium digital torque wrench ensures I’m tightening bolts just right, preventing issues before they arise. My light stand accessories kit helps me adapt to various environments swiftly. Also, I always keep spare rubber grip pads from trusted suppliers, knowing that their quality helps me maintain a secure hold even during intense shoots. These essentials have become my secret weapons against instability.
Keeping Calm and Stabilized on the Set
Sometimes, the biggest difference between a shaky shot and a smooth one is mindset. When I approach each setup with the expectation of checking every support point, I reduce the chance of overlooking a critical issue. I also dedicate a few minutes before shooting to perform a thorough stability test—gently shaking the rig and verifying handle tightness and support leg security. This habit, though simple, quietly elevates my confidence and the quality of my footage. Embracing this routine empowers me to face unpredictable conditions and ensures my gear performs at its best.
Supporting your camera rig with confidence starts with attention to detail and proper maintenance. For a comprehensive look at advanced stability techniques, check out our boom arm setup guide—it complements the handle fixes discussed and helps you craft a foolproof support system. Remember, a stable rig isn’t just about gear; it’s about your passion for capturing excellence.
What Unexpected Lessons Have You Encountered?
Have you ever experienced a support failure just when you needed it most? Share your story in the comments below—your insights could save others from making the same mistake. Let’s build a community where we learn and grow together in mastering the art of support stability for filmmaking success.