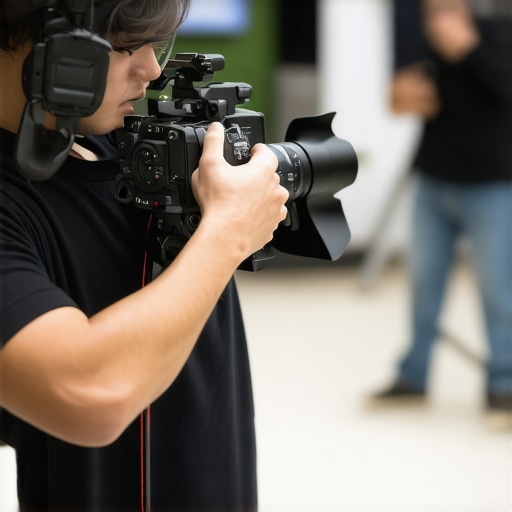
One afternoon during a shoot, I felt a sharp twinge in my shoulder as I adjusted my camera rig. It was almost comical—my rig had become a weighty beast, pulling me in uncomfortable directions, forcing me into awkward angles, all because I hadn’t paid enough attention to its balance. That moment was my lightbulb: I was neglecting the importance of proper camera rig balancing, and it was taking a toll on my body. If you’ve ever experienced similar discomfort, you’ll know how quickly it can turn a creative session into a painful chore.
Why Proper Camera Rig Balance Stops Shoulder Pain in Its Tracks
Many filmmakers overlook the significance of balance when setting up their camera rigs. They focus on getting the shot, but forget that an unbalanced rig isn’t just unstable—it’s also a persistent source of strain and pain, especially in your shoulders, neck, and back. I used to dismiss this issue, thinking I just had to power through. Until I realized that the root cause was poor support, and my body was paying the price.
It’s no secret that longer shoots demand more from your gear and your body. According to a study on stabilizing equipment, improper support setups can lead to multiple issues, including pain and equipment damage. The good news? Simple adjustments can make a world of difference. Today, I’ll share the three most effective camera rig balance fixes I discovered firsthand—fixes that could save you from pain and boost your shooting confidence.
Have you ever faced shoulder discomfort during your shoots? Stick around—I’m about to show you how to fix that for good.
Is Camera Rig Balance Really That Critical or Just a Trend?
Early in my career, I made the mistake of assuming that a quick setup would do. I believed that minor imbalances wouldn’t matter much. Turns out, I was dead wrong. A poorly balanced rig not only impacts shot quality but also puts unnecessary strain on your body. Ensuring proper support isn’t just a trend; it’s a necessity. Trust me, taking the time to get this right can improve your stamina and protect your health. For more tips on building a solid setup, check out this comprehensive guide.
Start with a Solid Foundation
Before you even attach your camera to the rig, choose a stable support like a high-quality tripod from the best tripods for professional shooting. Place it on an even surface, ensuring the legs are fully extended and locked. For uneven terrain, consider using a leveling base or adjustable feet. When I first set up mine on a slightly sloped concrete, I used leveling mats and a spirit level, which immediately reduced wobble and made aligning the rig easier—making me realize the importance of a stable base.
Distribute Weight Like a Pro
Imagine your camera rig as a scale—you want the weight centered and evenly spread to avoid tipping or sagging. Start with the heaviest components, such as your camera body or large lenses, positioning them close to the support axis. Use support arms, such as the support arms and boom supports, to balance lighter accessories. In a shoot where I mounted a heavy cine lens and light matte box, I moved the lens as close to the support point as possible, then adjusted the support arm position to evenly distribute weight, which prevented the rig from tilting forward during my shot.
Fine-tune Tension and Locks
Once your components are positioned, focus on tension adjustments—tighten or loosen support arm knobs, tripod clamps, and central locking mechanisms to eliminate movement. For example, I once forgot to tighten the boom arm clamp tightly, which caused sudden sag during a take. After learning to double-check all tension points, I noticed a significant reduction in unwanted movement, resulting in smoother footage. Remember, a well-tensioned rig remains stable without being overly stiff, which could cause stress on parts.
Use Visual Aids to Confirm Balance
Identify the balance point visually or with a small bubble level attached to your rig. When everything is properly balanced, the rig should rest level without support from your hand or external stabilizers. In one messy setup, I used a makeshift bubble level glued onto my support arm, which quickly showed that my camera was slightly tilted forward. Adjusting the support arm position until the bubble centered made a huge difference in shot stability.
Integrating these steps consistently will dramatically reduce shoulder strain and improve your shot quality. For more detailed techniques on support setup and camera rig assembly, check out this comprehensive guide.
 When it comes to lighting and support gear like light stands, C-stands, tripods, and boom arms, many filmmakers and hobbyists alike fall prey to oversimplified beliefs that hinder optimal setups. Let’s dig deeper into some misconceptions and advanced pitfalls that can trip up even seasoned professionals. One prevalent myth is that heavier equipment automatically guarantees stability. While mass does contribute to steadiness, design and material quality play crucial roles. For instance, a lightweight tripod made from high-grade aluminum can outperform a bulky, poorly manufactured alternative in terms of vibration dampening and movement control. Relying solely on weight can lead to neglecting essential features like proper locking mechanisms and base design. Overextending tripod legs or supporting arms beyond their rated capacities might seem harmless but can cause sudden collapses or unwanted tilts. An overlooked nuance is the importance of center of gravity positioning. Positioning heavier elements centrally and low helps maintain balance, especially during lengthy shoots. Misjudging this can result in gear topple or vibrations that ruin shots. Consider this: many users neglect to use additional support like sandbags or weighted bases, erroneously trusting that their rigs will hold firm due to stability alone. This oversight is common during on-location shoots on uneven terrain, where even minor shifts can cause dramatic misalignments. Exploring more advanced setups, like integrating support arms with quick-release features, can speed up adjustments without sacrificing safety, but many skip this step, risking mislocks and accidental drops.
How Can You Prevent Support Gear Sags Under Load
Achieving stable support isn’t merely about choosing the right equipment. Proper tensioning and regular maintenance of locking mechanisms are essential. During prolonged shoots, components can loosen due to vibrations or thermal expansion, leading to gradual sagging. Regularly checking and tightening support arms, tripod locks, and C-stand grips preserves stability. Moreover, understanding how to distribute load evenly across support structures helps in avoiding localized stress points that cause bending or warping over time. External experts emphasize that even minor misalignments can amplify vibrations, affecting shot sharpness. For example, a study on support system vibrations highlights that well-maintained, properly tensioned supports significantly reduce unwanted camera shake, leading to more professional results. To master these nuances, visit our guide on mastering tripod stability. Have you ever fallen into this trap? Let me know in the comments.
Maintain Your Support Gear Like a Pro
Ensuring that your light stand, camera rig, C-stand, tripod, or boom arm stays in top condition requires more than just occasional use. Regular maintenance is key to prolonging their lifespan and avoiding unexpected failures during critical shoots. Personally, I swear by performing a quick inspection before every session—checking for loose bolts, worn rubber feet, and fluid movement in support arms. This proactive approach helps me catch issues early and keeps my equipment reliable.
One crucial aspect I focus on is lubrication. Using a silicone-based lubricant on adjustable joints and locking mechanisms prevents gumming up and ensures smooth operation. For example, I often apply just a small amount of lubricant to the support arm pivots, which maintains fluid movement and prevents squeaking. Be careful to avoid over-lubricating, as excess can attract dust and debris.
Tools I recommend for routine maintenance include a set of Allen wrenches, rubber mallets, and a microfiber cloth for cleaning dirt and dust from support components. For deeper upkeep, consider investing in a torque wrench to ensure bolts are tightened to manufacturer specifications, preventing over-tightening or loosening over time. Proper tightening is especially critical for C-stands, where uneven tension can compromise stability.
In the future, I predict that smart support systems with integrated sensors may become standard, providing real-time health monitoring for your gear. Companies are already exploring IoT-enabled equipment that alerts you to loose screws or mechanical wear—imagine receiving a notification before your support arm droops unexpectedly. Staying ahead of these trends requires diligent maintenance now, but it’s exciting to think about how technology will evolve to make gear management even easier.
How do I maintain my support gear over time?
Consistent cleaning, inspection, lubrication, and timely replacement of worn parts are essential. Establish a routine schedule—monthly for regular checks and after intense use—to keep everything functioning flawlessly. Remember, the better you care for your gear, the longer it will serve you during demanding shoots. For detailed advice on supporting gear we’ve tested, visit this comprehensive support setup guide. Don’t hesitate to try out an advanced tip like using a torque wrench to ensure correct bolt tightness; it can save you hours of troubleshooting later. Proper maintenance isn’t just about safety—it’s about performance confidence and longevity of your investment.
Lessons That Changed My Support Setup Game
- Never Overlook Small Adjustments: I used to think tightening support clamps once was enough. Now I know that periodic retightening during a shoot prevents subtle sagging that spikes vibration and causes blurry footage. Tiny tweaks often make a big difference.
- Balance Is an Ongoing Process: Achieving perfect support setup isn’t a one-time task; it’s an art of continuous fine-tuning, especially under changing conditions. Regularly reassessing balance helps maintain stability and prevents stress buildup.
- Equipment Quality Matters More Than Weight: I learned that investing in high-quality, well-designed support gear beats relying solely on heavy equipment to prevent sagging or tipping. Material choices and locking mechanisms are critical for durability and safety.
My Top Picks to Elevate Your Filming Support Arsenal
- Heavy-duty Boom Arms: Devices like the support arms with reinforced joints have transformed my support system, providing stability without droop.
- Versatile Tripods: The top-rated tripods of 2024 combine lightweight portability with rock-solid stability, enabling quick setup on location.
- Support Arms with Quick-Release Features: Speed and security matter; quick-release support arms allow rapid adjustments without compromising rig stability, essential during live shoots.
- Proper Support Accessories: Small additions like support stands, sandbags, and rubber feet are often overlooked but vital for maintaining balance and safety in challenging environments.
Embrace Your Inner Support Specialist
Every filmmaker has the power to improve their support gear mastery—making setups faster, safer, and more reliable. Regular maintenance, a keen eye for balance, and investing in quality gear turn ordinary setups into rock-solid foundations for filming excellence. Remember, your gear’s stability directly impacts your creativity; when you eliminate doubts about support, your confidence soars and your shots become smoother. Don’t wait until a sagging arm or unstable support ruins your next shot—start applying these insights today and watch your filmmaking elevate to new heights. How has a support setup mistake affected your shoots? Share your story below.