It was a frantic shoot day when my trusty camera rig suddenly wobbled mid-take. My heart sank as I watched my shot destabilize, breaking the seamless flow I had painstakingly built. That moment hit me hard—reliable support gear isn’t just about convenience; it’s vital for professional results. If you’ve ever faced a shaky shot because your tripod or light stand failed at a critical moment, you’re not alone. Today, I want to share my journey and how choosing the right top tripods and light stands transformed my filmmaking game. We’ll dive deep into the essentials for 2024, so you never have to worry about unstable setups again.
Why Investing in Quality Support Gear Changes Everything for Filmmakers
Selecting the perfect support equipment can make or break your production quality. When I first started, I underestimated the importance of sturdy, reliable stands, often settling for the cheapest options just to save a few dollars. That mistake taught me that compromised gear leads to shaky footage, missed shots, and hours wasted troubleshooting. Over time, I discovered that top-tier tripods and support arms—like those detailed in our ultimate guide to camera rigs and support gear—provide stability that elevates your entire filming setup. Modern designs incorporate innovative materials and engineering, making them lighter yet stronger, adaptable for studio or location shoots.
But here’s the kicker—choosing gear isn’t just about brand names or price tags. It’s about understanding your specific needs, the environments you shoot in, and the compatibility of each piece. This tailored approach will prevent frustration on set and ensure your shots stay steady, lighting remains consistent, and your creative vision isn’t compromised. I’ll walk you through how to evaluate your options and avoid the common pitfalls, like failing to test your equipment thoroughly before a big shoot. Trust me, a small investment in quality support gear pays off in professional results—and peace of mind.
Are you currently struggling with unstable support gear during your shoots? If so, let’s explore how to select the best equipment for your needs and prevent those nerve-wracking moments that can ruin a perfect shot. Ready to step up your filmmaking stability? Stay tuned, because in the next sections, I’ll share expert tips to master tripod stability and assemble the ultimate rig setup for 2024.
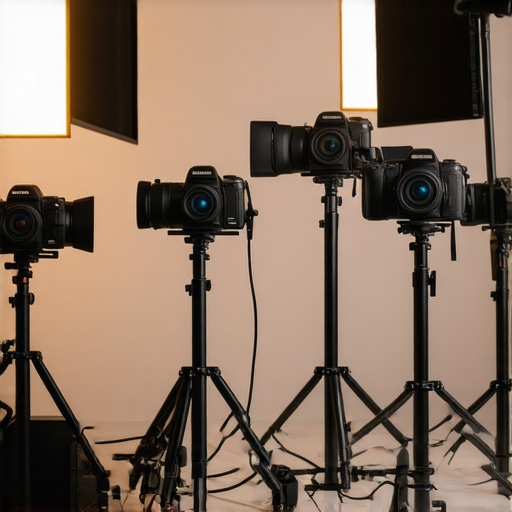
Secure Your Tripod Foundations
Start by selecting a tripod with a robust build, featuring thick, lockable legs and a sturdy center column. During my last shoot, I replaced a flimsy tripod with a heavy-duty one, and the difference was night and day. Test the tripod on uneven ground by extending each leg fully and applying gentle pressure to ensure stability. Use a bubble level to verify that your camera platform remains perfectly horizontal—this prevents tilted shots and keeps your footage professional.
Perfecting Light Stands and Boom Arms
Opt for light stands with wide, rubberized feet and reinforced columns to prevent wobbling. When setting up a boom arm, I tighten all connection points and balance weights carefully—imagine it like balancing a tightrope walker. For example, during a recent indoor shoot, I balanced my boom arm precisely with sandbags, ensuring lightest vibrations even when adjusting the angle. Additionally, position the stand on stable, level surfaces, and avoid shifting during the shoot. To learn more about effective light/support stand setups, visit this guide.
Using C-Stands for Versatile Support
C-stands are your go-to for holding flags, reflectors, or smaller lights with precision. When I needed a quick setup for a close-up shot, I employed a C-stand with sandbags on both legs for added stability. Make sure to lock all wheels and tighten all grip arms thoroughly—it’s akin to securing a tripod’s legs but with added flexibility. For optimal performance, regularly inspect your C-stands for wear and tear, and adjust their height and angle meticulously. Discover more about choosing the right C-stand for your setup at this resource.
Assembling the Camera Rig Effectively
Constructing a reliable camera rig involves layering support components—start with a stable tripod or cage, then attach a supporting boom or stabilizer if needed. When I built my first rig, I used a quick-release mechanism on my tripod head, allowing me to swap lenses swiftly without losing stability. Balance is key: add counterweights on the opposite side of heavy equipment to prevent tilting—think of it like balancing a seesaw. For detailed assembly instructions, see this guide.
Test and Fine-tune Before Shooting
Once everything is assembled, perform a thorough stability check. Gently shake the support structures, observe any wobbling, and tighten connections as needed. During a recent outdoor shoot, I discovered my light stand’s wobble was caused by uneven ground; adding a larger base and leveling it fixed the issue immediately. Remember, micro-adjustments can save you from shaky footage later. Always revisit your setup after any transport or adjustments, making sure everything remains tight and secure—your shots depend on it. For expert tips on testing setup stability, visit this page.Many filmmakers believe that support gear like boom arms, light stands, C-stands, tripods, and camera rigs are straightforward tools, but this oversimplification often leads to costly mistakes. A prevalent myth is that heavier or more expensive equipment always offers better stability. While weight can contribute to steadiness, improper assembly or neglecting nuanced setup details can nullify these advantages. For example, a sturdy-looking tripod might still wobble if its legs aren’t locked properly or if the ground isn’t level—details that smart filmmakers never overlook. Another common error is assuming that all support gear is universally compatible; in reality, mismatched components can cause instability or damage. Taking the time to understand each piece’s specifications and proper application is crucial. A lesser-known nuance is the importance of micro-adjustments. Small tweaks—like fine-tuning leg angles or tightening grip arms—make a significant difference in stability, especially when working with delicate or high-precision setups. Experts emphasize that micro-adjustments can prevent micro-vibrations from ruining a shot, and neglecting them is a frequent pitfall. For advanced users, integrating support gear with your camera rig through innovative support arms or specialized clamps can streamline the workflow and improve shot quality. This setup might seem elaborate, but as highlighted in our ultimate boom arm setup guide, it’s a game-changer in achieving seamless, professional results. Beware of the trap of rushing setup or ignoring manufacturer instructions—such shortcuts often lead to micro-movements or equipment failure. A quick tip is to regularly inspect and maintain each piece, ensuring bolts and joints are secure before every shoot, as wear and tear silently compromise stability over time. Remember, investing in high-quality support gear and mastering its nuances safeguards your footage quality and saves you from costly retakes. Want to dive deeper into perfecting your setup? Check out our comprehensive guide to camera rigs and support gear. Have you ever fallen into this trap? Let me know in the comments.Maintaining your filming support gear ensures your setups stay stable and ready for any shoot. First, invest in quality tools like Allen wrenches, socket sets, and cleaning kits. For example, I swear by a set of precision Allen wrenches to tighten grip arms and C-stands securely. Regular inspection of joints, locking mechanisms, and rubber feet prevents unexpected failures. Applying a small amount of lubricant, such as silicone spray, to moving parts can significantly extend their lifespan and keep everything operating smoothly. I also recommend keeping a log of maintenance sessions—marking dates and repairs helps identify patterns that could signal impending issues.
When it comes to cleaning, a soft cloth and mild cleaner are enough to remove dust and grime from support arms and tripod legs. Avoid harsh chemicals that might degrade rubber components or metal finishes over time. For delicate parts, a compressed air blower can remove dust from inaccessible areas without disassembly.
Trend prediction: As materials evolve, we’ll see support gear made from composites that tolerate higher stress and resist corrosion. This shift demands new maintenance routines tailored to these advanced materials. Staying ahead means adopting cleaning and tightening schedules aligned with manufacturer guidelines—these are often detailed in technical documentation or user manuals, like those found in the privacy policy section of support companies’ websites.
How do I keep my support gear working flawlessly over time?
One of my best practices is setting a biannual maintenance routine, including lubrication, structural inspection, and part replacement when necessary. For example, I replace worn rubber feet on light stands before they crack or fall off, which keeps stability intact. Using specialized tools, like torque wrenches, ensures you don’t overtighten or under-tighten components, avoiding damage or loosening during critical shoots.
The future of maintenance points toward smart support gear with embedded sensors that monitor stress and wear. Although still emerging, integrating such tech can give filmmakers early alerts that something needs attention, preventing catastrophic failures.
To elevate your support setups, try tightening all grip arms and adaptors with a torque wrench following manufacturer specs and see how much more stable your shots become. Consistent maintenance is key—because neglect now results in unstable footage later. For detailed techniques, check out expert advice at this guide. Proper care doesn’t just prolong equipment life; it directly impacts your video quality.
The Hard-Won Truth About Cheap Gear and Shaky Shots
One of the most valuable lessons I learned was that cutting corners on support gear often leads to costly retakes and compromised footage. A lightweight tripod might seem appealing, but if it wobbles during a crucial shot, all your effort goes out the window. Investing in quality support gear not only enhances stability but also saves you time and frustration on set. Remember, in filmmaking, reliability isn’t a luxury—it’s a necessity.
The Hidden Perils of Overlooking Micro-Adjustments
I used to think that once my support stands were set up, my work was done. Not true. Micro-adjustments—like fine-tuning the legs or grip arms—can make a significant difference in shot stability. These subtle tweaks prevent micro-vibrations that destroy image clarity, especially important in high-precision filming conditions. Paying attention to these details elevates your craft and results in professional-grade footage.
The Power of Regular Maintenance and Preparation
Ceasing maintenance is a trap many filmmakers fall into. I learned the hard way that inspecting and caring for my stands and rigs periodically keeps them performing optimally. Simple actions like tightening bolts, lubricating joints, and replacing worn rubber feet can extend your equipment’s lifespan and ensure unwavering support. Staying proactive with gear maintenance means fewer surprises during critical moments and consistently smooth shoots.
Insider Wisdom for Building Killer Rig Setups
- Balance is everything: Always add counterweights when dealing with heavy or uneven loads. It’s a game-changer for stability and safety, especially with rigs or boom arms.
- Test before the shoot: Shake your setup gently, observe every joint and connection, and tighten as needed. Small checks prevent big problems when you’re on a tight schedule.
- Use high-quality support arms and clamps: They streamline your workflow and hold everything securely—details that prevent micro-movements and micro-vibrations.
For a comprehensive deep dive, check out our ultimate guide to camera rigs and support gear. Remember, mastery of your support gear directly translates to professional results and peace of mind on every shoot.
My Go-To Resources That Keep Me Stable
- Top camera rigs and tripods for 2024—A curated list that combines innovation with reliability, perfect for elevating your filmmaking stability.
- C-stands and boom arms for studio success—My trusted sources for all versatile and heavy-duty support needs.
- Light stand essentials—These tools help me achieve smooth, stable lighting setup with ease.
Your Support System Awaits Your Next Creative Leap
Now that you’re equipped with insider tips and trusted resources, there’s no limit to what you can create with stable, professional support gear. Embrace these practices, and watch your filmmaking soar in 2024. Support gear isn’t just equipment—it’s the backbone of your artistry, ensuring every shot is picture-perfect. Ready to take your setups to the next level and eliminate instability forever? The future of steady filming starts now.
What’s been your biggest challenge with support gear, and how did you overcome it? Share your story below!
Reading this post reminded me of a shoot I did last year where my cheap tripod completely failed on a windy day, causing the camera to sway just as I was capturing some important footage. That experience was a harsh lesson in always investing in quality support gear. Since then, I’ve made a point to research and select sturdy, well-built tripods and support stands that can handle different environments, especially for outdoor shoots. I also learned the importance of micro-adjustments—little tweaks in the setup can make all the difference in preventing micro-vibrations, which are often overlooked but critical for high-quality footage. Does anyone have tips on the best ways to test support stability quickly before starting a shoot? I’d love to hear how others ensure their gear is ready for those crucial moments, especially when working under tight schedules.
This post hits the mark for filmmakers who want to ensure their support gear actually supports their vision! I’ve personally learned that overlooking small details like locking legs properly or not checking level surfaces can turn a smooth shoot into a shaky nightmare. I agree with the emphasis on micro-adjustments—nothing can ruin a shot faster than micro-vibrations caused by different setup tweaks. One trick I’ve found helpful is doing a quick shake test after setting up, just to see if anything wobbles noticeably before starting to film. Also, using a spirit level on the support platform ensures your camera stays perfectly aligned, especially on uneven outdoor terrain. Have others found any particular tools or quick routines that make stability checks more efficient? It would be helpful to hear different methods, especially for those working on tight schedules or in challenging environments. Ultimately, consistent maintenance and detailed setup are what give me confidence that my shots will come out steady, no matter the conditions.