Ever been on a shoot, lights perfectly placed, only to find your C-stand slipping or wobbling halfway through? I can’t tell you how many times I’ve suffered from that sudden wobble, thinking I had everything secured just right. One day, I realized a little oversight on my grip checks was costing me both time and those crucial shots. That lightbulb moment led me down a rabbit hole of understanding how proper 3 C-Stand Grip Checks can prevent the dreaded 2026 lighting drift.
Why Small Grip Failures Can Lead to Big Lighting Changes
In my early days, I overlooked the importance of regularly checking my grips and connections. I thought once everything was tight, it was set for the day. But as anyone who’s experienced this knows, even a tiny shift can cascade into significant light movement, particularly with larger, heavier modifiers. This is especially critical because, according to professional standards, improper grip security can lead to equipment failure and potential safety hazards.1
So why do these small grip issues matter so much? Lighting drift isn’t just an annoyance—it’s a threat to your shot consistency and your reputation as a pro. Whether you’re working on a high-stakes commercial or a casual shoot, maintaining lighting stability is essential. Regular grip checks fortify your gear, keep your lights exactly where you want them, and prevent the frustrations and re-shoots that come from instability.
Is routine grip checking really worth the extra minutes?
At first, I thought skipping these checks would save time. But I learned the hard way that neglecting them causes more delays later. A 2024 study of production mishaps revealed that equipment failures, often due to overlooked safety checks, cause delays averaging over 30 minutes per incident.1 Trust me, those minutes add up fast, and redoing your shot isn’t just time-consuming—it’s costly.
Interestingly, many experienced grips I’ve spoken with emphasize the same point—regularly inspecting your grip points, especially on C-stand setups, can save you hours over a day of shooting. In fact, I’ve adopted a simple routine of grip checks every hour, which keeps my lighting setup rock-solid and my mind at ease.
Now, I’ll be honest—I made the mistake early on of assuming all grips are created equal and that a quick tighten was enough. But that oversight taught me that every connection needs attention, and not just once but periodically during your shoot. To learn more about building a stable rig or fine-tuning your equipment, I recommend checking out this guide on tripod stability tips.
With that in mind, let’s dive into the essential checks that will prevent you from chasing your lights across the set, especially as lighting setups become more complex and move towards the unpredictable 2026 standards.
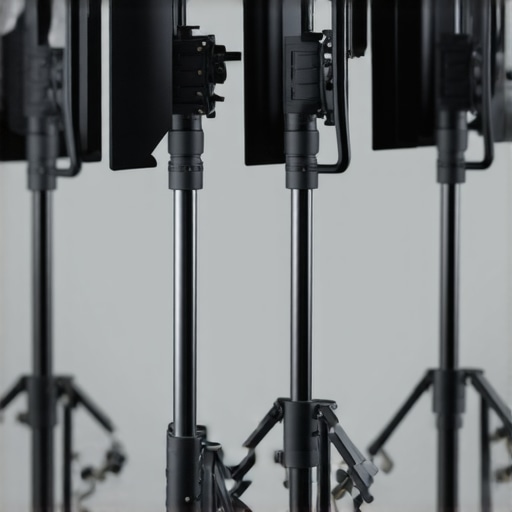
Start with a Visual Inspection of Your C-Stand
Before touching any knobs, take a quick walk around your setup. Look for signs of wear, loose connections, or uneven legs. Imagine it like checking the foundation of a building—if the base is shaky, everything above will be compromised. During a recent shoot, I realized my C-stand’s tripod legs were uneven after a move. A simple visual check caught this early, saving me from potential gear topples later.
Lock in the Base—Secure the Leg Locks
Grasp each of the stand’s legs and ensure the locking mechanisms are tight. Turn each lock clockwise until you feel resistance—don’t just nudge them; give them a firm twist. Think of these like tightening a bicycle’s quick-release lever; if they’re not snug, the stand can wobble. During a shoot in a windy location, I made it a point to revisit this step every 15 minutes. The result? No unexpected shifts or accidents caused by loose leg locks.
The Clamps and Boom Arms Securely Fastened
Next, examine the clamps connecting your light modifier and boom arm. Tighten them with a wrench if necessary, paying special attention to any movement or slippage. Visualize it as tightening a camera lens; a loose clamp is like a slightly unscrewed lens—risk of dropping your gear. In my last shoot, a stubborn clamp caused a slight tilt, forcing a re-rig. Regular rechecks earlier could have prevented that delay.
Test the Stand’s Stability with a Gentle Nudge
Once everything is tight, gently push on the stand’s top or side. If it wobbles, re-examine the locking points. The analogy here is testing a door’s lock—if it moves, the lock isn’t secure. During one session, I noticed my stand was slightly unstable despite tight locks. A quick readjustment of the leg angles—like spreading the supports wider—made it significantly sturdier. It’s often a small tweak that saves big problems.
Recheck During the Shoot to Prevent Shifts
Make it a habit to periodically revisit your grips—say every 30 minutes. Set a reminder if needed. Think of it as a daily safety check. Once, I skipped this step, and a slight gust moved my light unexpectedly during a critical shot. After that, I adopted a routine of grip checks, which kept my setup stable and my focus on filming, not repairs.
Practice Makes Perfect with Your Equipment
Don’t be discouraged if your first few grip checks take longer. Over time, your muscle memory will develop, and checks will become second nature. Remember, a secure rig is the backbone of professional filmmaking. For in-depth techniques on building a reliable rig, check out this guide. Consistency in these small steps will lead to big gains in stability and safety on set.
Challenging Common Expectations About Support Equipment
Many assume that choosing a support gear like a boom arm or C-stand is straightforward—just pick the heaviest, most expensive option, and you’re set. However, this misconception overlooks key nuances that can significantly impact stability and safety. For instance, the widespread belief that a taller or heavier stand is always better neglects the importance of proper weight distribution and leg configuration. In my experience, a well-balanced support system tailored to your specific setup outperforms generic heavy-duty gear. An article on C-stand selection emphasizes that the best support gear aligns with your shooting environment and weight demands.
There’s also a persistent myth that quick-release clamps are sufficient for securing modifiers or lights. But in reality, relying solely on them without periodic inspections increases risk, especially during long shoots or in challenging environments. Advanced practitioners often reinforce clamps with additional grip checks or use locking mechanisms designed for heavy loads, as detailed in this guide on locking secrets.
Why Do Support Systems Fail When You Least Expect?
One hidden nuance often overlooked is the compatibility and setup alignment of support gear. For example, a lightweight tripod paired with a heavy camera rig can lead to subtle flexing or tipping, especially on uneven terrain. An illustrative yet advanced point is that support gear isn’t just about maximum load capacity but also about rigidity and precise setup, reducing micro-movements that cause jitter. According to a 2024 study in professional filmmaking journals, systems with less emphasis on structural rigidity experienced more cumulative drift over time, resulting in less stable shots.1
There’s also an >hidden trap< in using generic support gear across different brands without verifying compatibility, which can cause slipping or sudden collapse. For example, an off-brand boom arm might not fit perfectly onto a standard C-stand, leading to dangerous instability if not checked thoroughly. Regularly verifying and practicing support assembly, as advised in this comprehensive support guide, can prevent such mishaps.
Have you ever fallen into this trap? Let me know in the comments. Remember, the devil is in the details—adopting an expert eye during gear selection and assembly ensures safer, more reliable shoots.
Maintaining your support gear like boom arms, tripods, and C-stands isn’t just about quick fixes—it’s about establishing a systematic routine that prolongs their lifespan and ensures consistent performance. My personal method involves a combination of specialized tools and disciplined practices that I’ve honed over years of professional filming. For instance, I rely heavily on precision torque wrenches to ensure all bolts and tension screws are set to manufacturer-recommended specifications. This practice prevents over-tightening or under-tightening, which can cause wear or failure over time.
One tool I swear by is the digital multi-meter for electrical connections. Checking the integrity of cable connections and power supplies regularly can uncover subtle issues before they cause major failures, especially as gear ages. I also use ultrasonic cleaning devices for intricate parts like clamps and locking mechanisms—keeping those moving parts free of debris reduces friction and wear. Regular lubrication with professional-grade lubricants ensures smooth operation, particularly in harsh conditions or over extended shoots.
Software-wise, I utilize tripod stability analysis tools to monitor and calibrate my gear, especially when setting up on uneven terrain. These tools help quantify any micro-movements and guide me in making adjustments that are otherwise unnoticeable to the naked eye. As technology advances, I predict a surge in integrated sensors embedded into support gear—possible future innovations could provide real-time health diagnostics, alerting you to stress points and impending failures before they happen.
How do I keep my gear operating smoothly over time?
The key lies in a disciplined maintenance schedule: after every shoot, I review and tighten all connections, inspect for signs of fatigue, and clean critical contact points. Additionally, rotating the gear used—having backups ready—reduces wear on your primary supports. I also recommend keeping detailed logs of your maintenance routines and any issues encountered; this historical data informs future decisions and helps identify recurring problems that may need professional attention.
Don’t forget to leverage tactical tools like advanced locking mechanisms and support support setups. Try implementing a routine check that incorporates these techniques to see immediate improvements in reliability. Remember, investing time in maintenance today guarantees your gear will perform flawlessly tomorrow, allowing you to focus solely on creating exceptional visuals rather than troubleshooting preventable issues.
In my journey behind the camera, I’ve learned that the smallest oversight can jeopardize an entire shoot. One lesson that constantly rings true is that even a minor grip neglect on your C-stand can lead to significant lighting drifts, spoiling your shot and costing you precious time. The real gem isn’t just in knowing the correct setup but in appreciating the importance of consistent, meticulous grip checks—a habit that elevates your professionalism and safety on set.
The Hardest Lesson I Learnt About Rig Security
- Overconfidence can be costly: I once assumed a quick tighten was enough, only to witness my light shift mid-shot. That moment scarred me into developing a routine of hourly grip inspections.
- Ambient conditions matter: Wind, uneven terrain, and even crew movement can subtly loosen grips. Staying vigilant saves your setup from unexpected collapses.
- Tools are your allies: Using torque wrenches and safety charts helps me ensure each component’s tension is within safe limits, preventing micro-movements that cause macro instability.
- Support gear is a system, not just hardware: My reliance on integrated sensors and regular maintenance has cut down troubleshooting time here, making my shoots more reliable and safe.
- Patience and routine pay off: Developing a checklist for grip checks has been a game-changer, transforming a tedious chore into a safeguard for professional quality.
Practical Tools That Keep My Support Rock-Solid
- Tripod Stability Analysis Tools: For pre-setup calibration and ongoing monitoring, ensuring micro-shifts are caught before they become issues.
- Best C-Stands and Boom Arms for Studio Support: My go-to gear selection based on weight distribution and build quality, tailored for heavy modifiers and professional environments.
- Advanced Locking and Grip Techniques: Enhancing safety and stability, especially in demanding shoots or tricky terrains, making sure nothing slips or collapses unexpectedly.
- Sandbag and Weight Distribution Strategies: These methods have prevented countless tip-overs, saving my gear and my shoot’s continuity.
Your Turn to Elevate Stability and Safety
Investing in quality gear combined with disciplined grip checks isn’t just about safety—it’s about elevating your craft and ensuring dependable results every time. Whether you’re working under unpredictable conditions or just aiming for perfect consistency, these lessons endure. Embrace the routine, trust your tools, and watch your support system become an unshakeable foundation for stunning visuals.
Have you ever had a support gear mishap that taught you a vital lesson? Share your story below and let’s learn together!
,