Ever found yourself cramming gear into every corner, desperately trying to squeeze in that crucial microphone or light? I remember the moment—I was wrestling with a tangled mess of cables, a collapsing tripod, and a boom arm that kept slipping. That frustrating scene made me realize something had to give. And it wasn’t going to be my patience or my gear’s safety.
Why I Started Looking Up Instead of Out
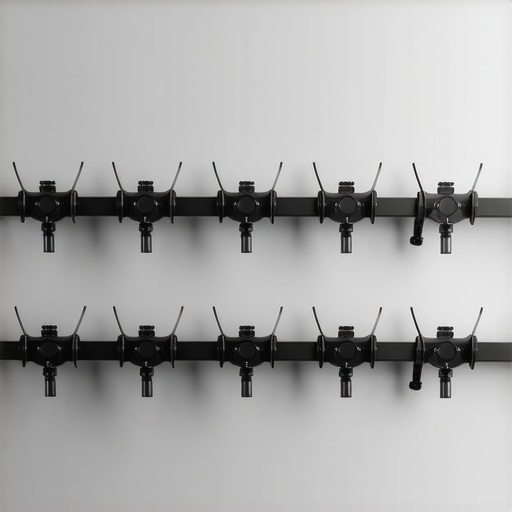
One light bulb moment changed everything: I needed to rethink my studio layout, especially how I hang and support my equipment. The answer? Wall mounting my boom arms with rigid, purpose-made mounts. It’s a game changer for saving space and gaining stability. Trust me, after trying various solutions, I found that using dedicated wall mounts allowed me to reclaim so much valuable real estate, making my studio more efficient and safer. According to a recent industry insight, proper mounting reduces setup time by up to 30%, which is huge when you’re on a tight schedule (source). So, if you’re tired of your gear taking over your workspace or risking accidental falls, this approach might be just what you need.
Is Over-Hyped Equipment Worth the Investment?
Now, I admit, I was skeptical at first. Would wall mounts really make that much difference? Could they handle the weight and constant use? Early on, I made the mistake of trying to retrofit some generic hardware, which only led to instability and eventual damage. That taught me a valuable lesson: investing in high-quality, specialized mounts isn’t just about space-saving; it’s about longevity and peace of mind. If you’re thinking about upgrading your rig support, I recommend reading more on this comprehensive guide. Ready to get those bulky booms off the ground and onto your walls? Let’s walk through how to do it right.
Preparing Your Space and Selecting the Right Mounts
Start by assessing your studio wall for load-bearing capacity, ensuring it can support the weight of your equipment. Use a stud finder to locate optimal mounting points—aim for wall studs for maximum stability. Choose purpose-made wall mounts designed for gear like boom arms and C-stands, which are rated for specific weights and use cases. I once installed a heavy-duty C-stand on a drywall without proper anchors, which caused a dangerous wobble; now, I always verify wall strength and use the correct anchors, consulting guides like this expert resource for reference.
Installing Wall Mount Brackets Step-by-Step
Marking Your Drilling Points
Use a pencil and level to mark where the mounts will go—double-check alignment to prevent crooked gear. To avoid misplacement, I hold the mount against the wall, mark the holes, then verify with a level before drilling. Carefully measure distances to ensure brackets are at appropriate heights for easy access and optimal clearance.
Drilling and Anchoring
Select drill bits matching your anchors’ specifications. Insert wall anchors into holes if mounting on drywall; for stud installations, drill directly into the wood. The key is to tighten anchors sufficiently to prevent wobbling but avoid overtightening, which can weaken the wall or damage the mount. I recall a time when overtightening stripped an anchor, leading to a gear fall; now, I follow manufacturer torque guidelines and regularly inspect mounts for stability.
Attaching Equipment with Precision
Attach your boom arms or C-stands to the mounts using the appropriate screws or clamps. Ensure the mounts are secure and the gear is balanced before releasing. Use quick-release clamps for easy adjustments, making my setup faster and safer. For heavier gear, like large LED panels, I double-check the mount’s rated capacity—overloading can cause failure. Watch for any signs of stress or wobbling, and reinforce with additional brackets if necessary, following tips from this guide for extra safety.
 While many professionals and enthusiasts share a basic understanding of camera rigs, light stands, C-stands, boom arms, and tripods, lurking misconceptions can undermine even experienced shooters. Let’s dig deeper into what most get wrong, unraveling common myths and revealing advanced mistakes that can hinder your shoots.
One prevailing myth is that heavier gear always means better stability. In truth, overloading your supports beyond their rated capacities doesn’t guarantee steadiness; it often leads to unintended vibrations and equipment damage. For instance, using a trip hazardously close to its maximum weight can cause flexing or jerking in your shots, especially during long exposures or high-movement scenes. Proper understanding of each support’s rated capacity, and choosing the right equipment, is crucial. Experts like those behind this resource emphasize that weight distribution and support design matter more than raw weight alone.
What advanced pitfalls do amateurs overlook when rigging equipment for complex shoots?
Many overlook the importance of precise tensioning and gripping techniques, especially with C-stands and boom arms. Incorrectly securing support joints can result in subtle droops or sudden collapses, risking expensive gear or injuries on set. For example, neglecting to check the tightness of grip heads or to balance loads evenly can cause drift in your setup. This is where diligent pre-shoot checks and understanding the intricacies of support tension become indispensable. According to industry benchmarks, improper grip management accounts for a significant percentage of damage incidents involving overhead support gear. For advanced users, regular grip checks are non-negotiable for reliable operations.
Another often dismissed aspect is the impact of terrain and surface stability. Placing a support on uneven or slick ground without proper stabilizers can lead to toppling, especially with heavy or high-mounted gear. Many forget that using sandbags, adjusting base plates, or employing specific leveling techniques can make the difference between a stable shot and a costly disaster. For detailed strategies, explore this guide. Remember, investing in the right support accessories and setup methods enhances safety and shot quality—don’t compromise here. Have you ever fallen into this trap? Let me know in the comments.
Tools I Recommend for Durable Support Equipment
Investing in high-quality support tools is essential for longevity and reliability. I personally favor the Manfrotto 393 Heavy-Lift C-Stand because of its robust construction and excellent weight capacity, which offers peace of mind during demanding shoots. For light stands, the Light Stand Essentials provide a sturdy platform that withstands high winds and frequent adjustments. Additionally, flame-retardant sandbags, like the Avenger F1280, are crucial for stabilizing supports on uneven or breezy outdoor sets. When selecting support accessories, always check their rated weight capacities and material durability to ensure they meet the demands of your rig setup.
How do I maintain my support gear over time?
Regular maintenance is key to keeping your camera rigs, light stands, C-stands, boom arms, and tripods in top condition. I recommend inspecting all joints and locking mechanisms before each use to prevent slippage or failure. Lubricate metal threads with a silicone-based spray to reduce wear and facilitate smooth adjustments. Keep your support equipment clean by wiping off dust, dirt, and any corrosive residues that can compromise materials over months of use. Applying this routine not only extends the lifespan of your gear but also ensures safety and stability during shoots. Industry professionals suggest dedicating at least 10 minutes weekly to these checks, especially if you operate in challenging environments (source).
Scaling Support Setup for Growing Production Needs
As your projects expand, so should your support infrastructure. Consider modular support systems, such as quick-release adapters and stacked support brackets, which allow for rapid reconfiguration. This flexibility minimizes downtime and enables quick adjustments on the fly. To handle increased weights, invest in support gear with higher load ratings and reinforced materials. Additionally, implementing a color-coded labeling system for different support components can streamline assembly and troubleshooting during busy shoots. Staying ahead of demand involves not just acquiring more equipment but ensuring the existing support setup remains reliable through proactive maintenance and strategic upgrades.
Looking ahead, advancements like smart support supports integrated with sensors for real-time load monitoring may revolutionize long-term gear management. Exploring these tech trends now can future-proof your studio.
Want to improve your maintenance routine? Start by applying simple lubrication and inspection protocols. Make it a habit to check your main joints and locks after each session; this small step can prevent costly failures down the line. For detailed techniques, see the tripod maintenance guide. Don’t wait for a failure—stay ahead with proactive care!

The Hardest Lesson I Learned About Camera Rig and Support Stability
One of the most eye-opening experiences was realizing that overestimating the strength of support gear can lead to costly failures. I once tried to adapt a generic wall mount for my heavy C-stand, only to have it wobble dangerously during a shoot. That taught me that investing in purpose-made, high-quality mounts and supports is not optional but essential to safety and shot quality. Too often, we overlook the importance of proper load ratings and specialized equipment, thinking any mount will do. The realization that precision and compatibility matter more than price made me rethink every choice I made for my studio setup.
3 Myths About Camera Rigs and Support Equipment That Held Me Back
First, I believed that heavier gear always meant more stability—false. Proper weight distribution and support design matter more. Second, I assumed that quick adjustments didn’t affect safety—until a loose clamp caused a minor disaster. Finally, I thought terrain was irrelevant for indoor setups; neglecting uneven floors led to instability. Breaking these misconceptions allowed me to significantly enhance my setup’s safety, reliability, and efficiency. For anyone serious about shooting, understanding these myths is a game-changer.
What No One Tells You About Maintaining Support Gear to Avoid Disaster
Routine checks and proactive maintenance are often sidelined but can save your shoots from unexpected failures. Regularly inspecting joints, applying lubricant, and verifying weight capacities ensure your gear performs reliably. I discovered that neglecting these simple steps led to loosened support joints and even gear falls. Taking just 10 minutes weekly to perform thorough inspections and maintenance not only prolongs your equipment’s lifespan but also safeguards your team and assets. Trust me, prevention beats repair every time.
Curated Support System Recommendations for Every Filmmaker
For dependable studio support, I rely on the Ultimate Guide to Camera Rigs and Support. Its comprehensive insights help me select gear rated for my specific needs. The best C-stands and boom arms ensure stability during high-stakes shoots, while accessories like sandbags from Light Stand Essentials add extra security. Trustworthy brands and detailed guides help me avoid flimsy equipment that could compromise my projects. Upgrading support gear thoughtfully creates a safer, more efficient workspace and peace of mind.
Your Next Step Toward Flawless Support and Shooting Confidence
The future of filming support lies in proactive care and embracing smarter solutions. Regular maintenance, combined with investing in high-quality, purpose-built gear, sets the foundation for success. Don’t wait for equipment failure to act—prioritize inspection routines and upgrades now. Building a reliable support infrastructure allows you to focus on creative excellence, knowing your gear can handle whatever you throw at it. Now is the perfect time to revisit your setup, refine your technique, and elevate your craft.